Nails of the week: blue with silver dots

dielle nail polish in modern goddess - somanylovelythings
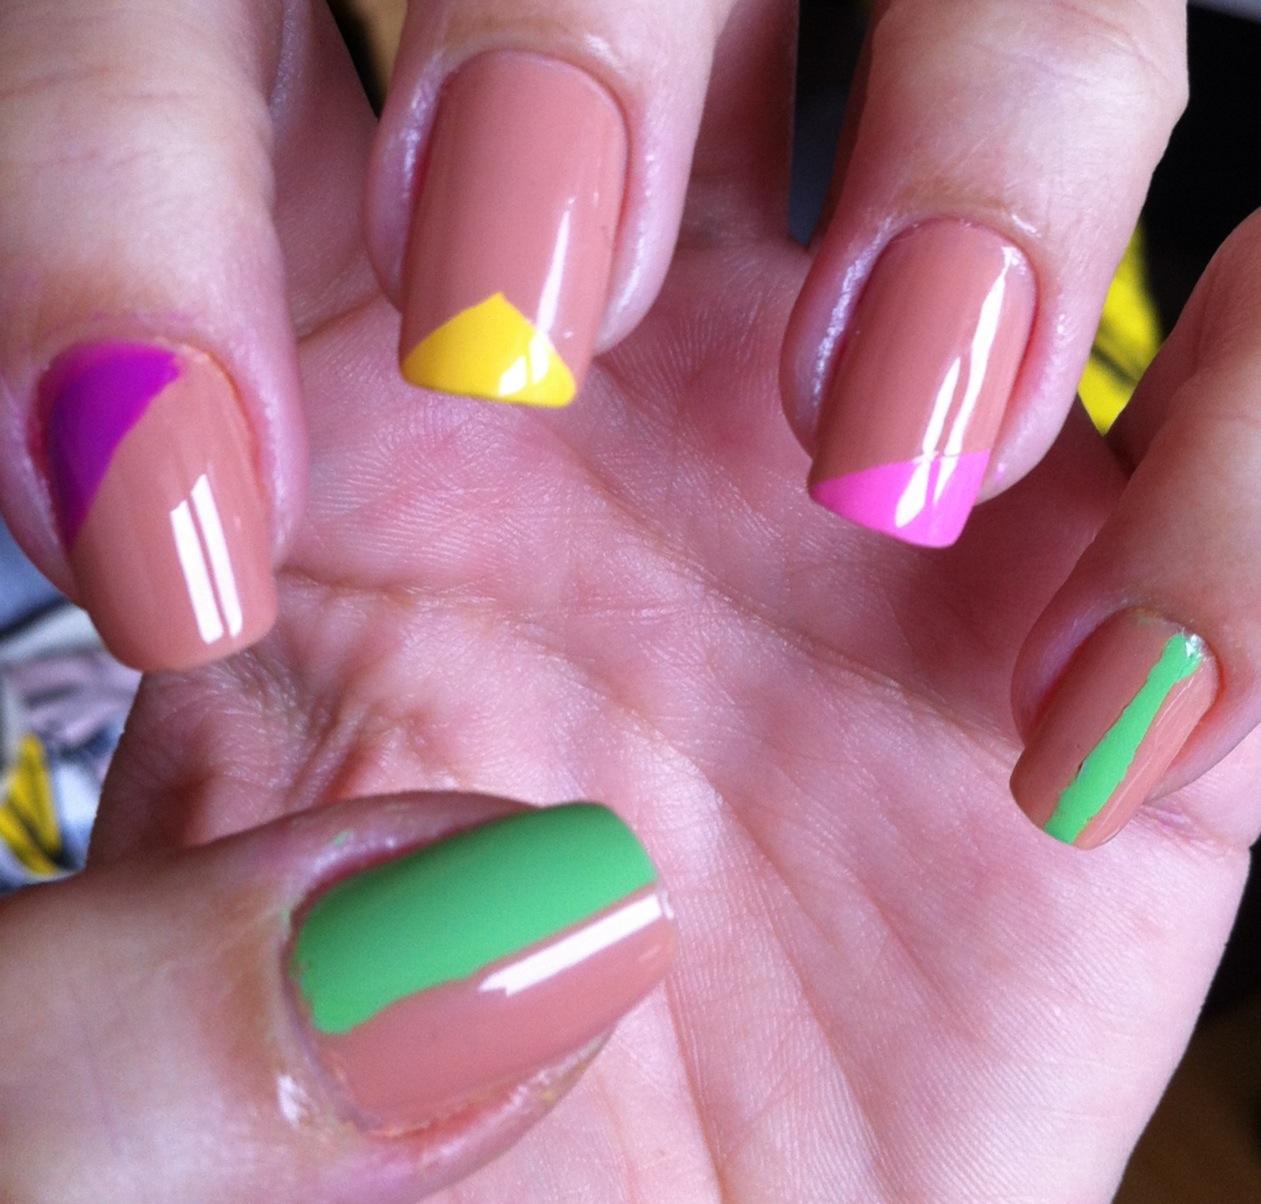
Now the dotting tools are out, I cannot stop! This week I tried a vintage inspired mani, but failed. Miserably. It looked awful. So I decided to take a step back and simplify.

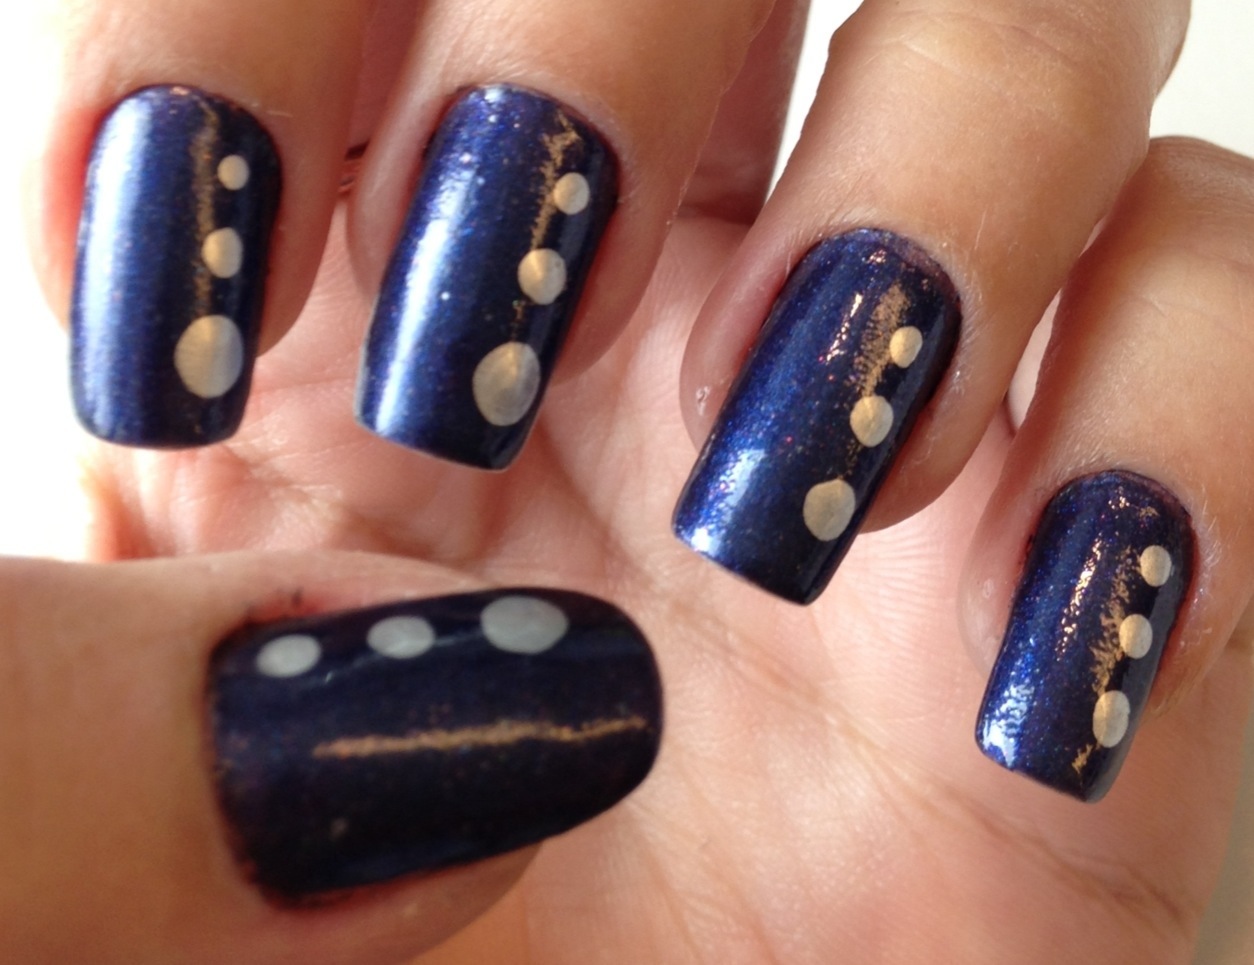
Took the opportunity to try the beautiful Dielle nail polish in Modern Goddess, a deep midnight blue, glittery (but with no texture), with hints of purple, part of their metallics collection.

dielle nail polish in modern goddess - somanylovelythings

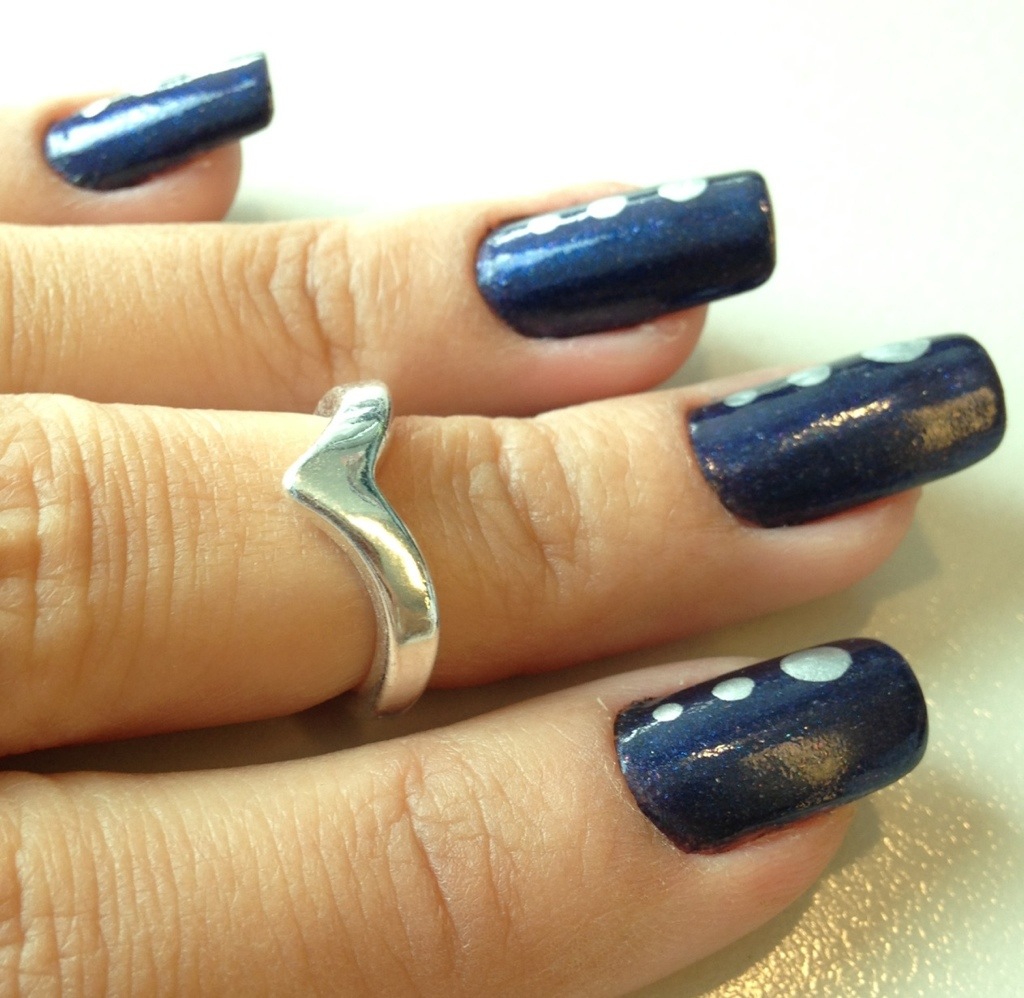
I had never tried Dielle’s polishes before. The packaging is rather nice and the brush applies well. The colour is well saturated and application was smooth and dried quickly. I am using two coats. They also have a non-toxic formulation, free from toluene, formaldehyde, DBP, camphor, & pthalic acid.

I then added three dots to the side of each nail using Barry M’s foil effects in silver. Durability was very good!

If you want to try their polishes, go to Dielle’s website – they have really great colours and nice kits! You can get Dielle’s Modern Goddess here.

This post contains PR samples. This review, however, is based on my own true experience with the products and reflects my honest opinion on them.

L’Oréal Paris new Color Riche Glitterati polishes launch and nail masterclass

Loreal color riche gliteratti nail polish

When it comes to my blog, a few things are more exciting than an event entitled Nail Masterclass, especially if it is with L’Oréal Paris.

The event took place in central London and a few bloggers had the chance to try the new Color Riche Glitterati collection and the Nails à Porter fake nails, learn to create a couple designs with L’Oréal’s nail expert Grace Humphries and find out more about L’Oréal’s new Nail Art website, nail-art.com, a portal where you can find the latest nail trends and expert tips.

Nail-Art.com

click on the image to enlarge

Nail-Art.com is full of advice, news, tutorials (easy to follow!) and has the colour expert, which is a tool where you can choose a colour and a level of difficulty and be presented with nail art ideas. They also have an app called the Color Genius, which helps you find the best make-up and nail colour for your outfit, and you can choose the match, blend and clash the suggestions! Clever, eh?

Color Riche Glitterati collection

Now, the new collection for the A/W13-14 and party season: the polishes are just gorgeous. As the name Glitterati suggests, all four shades are glitter based. What I really like about them is that you can use all as a topcoat, as an accent for nail art or on their own. They all have the Color Riche fan brush too, which is great! I swatched on the wheel with 3 coats; as you can see, the polish is very saturated with glitter. Two coats will also give a very good coverage.

Loreal giitterati collection

Sequin Extravaganza, Scarlet TInsel, Bling Bling Bang and Black Diamond

Sequin Extravaganza is an explosion of glitter colours and shapes. Clear base with mainly silver glitter in various shapes and sizes, it also has a bit of gold, blue, pink and green. This makes this polish quite multi-dimensional, and although there are so many different sizes, shapes and colours, it all sits together so well it creates the illusion of one layer. Pretty.

Scarlet Tinsel is a sea of beautiful dark pink fine glitter. It sparkles a lot and on its owns gives the nail a uniform cover.

The jellish blue base with sapphire blue glitter Bling Bling Bang is far from shy. The glitter is also a combination of small and fine with bigger circles and It has a jewel-like finish and looks amazing on its own, but also lush on black and other colours, with a little bit of colour shifting. I think I’ve been Bling Bling Bang(ed) – I actually tweeted it to L’Oréal. I have no shame.

Finally, Black Diamond is a metallic black with fine silvery glitter. It is the more discreet from the collection and looks beautiful on and it looks like asphalt when on. Like it.

Nails à Porter

click on the image to enlarge

We also found out about a new product L’Oréal is launching: Nails à Porter, their answer to the express manicure. The new fake nails, hitting the shelves soon, are great. To start with, they are super flexible. They come in different designs, from the classic red and French manicure to bold gold and black. It has little stickers, a great selection of sized to match your natural nails and are said to last up to five days. I will be testing them soon and posting my finds! Exciting!

Masterclass

click on the image to enlarge

As we sat in our lovely manicure stations, nail expert Grace Humphries taught us how to create two nail designs: glitter tip and glitter half-moon and French tip, which I tried on the wheel too.

I ended up painting on hand (yes, one hand. Oh the shame to take to tube back with one untidy hand!) with Black Swan and a Sequin Extravaganza gradient from the cuticles. This combination is great!

At the end, there was a nail polish pick-and-mix, where we could take the shades we liked to enter their Nail Art challenge – to which I have promptly sent my design, using loads of the polishes I took home.

click on the image to enlarge

It was a lovely evening, packed with news and very informative. The people were lovely, the new polishes are amazing, the nails à porter are a very interesting product. Cannot wait to keep using the polishes!

Nails of the week: Spotty blue and yellow

blue and yellow spotty nails - somanylovelythings

It had been a while since I had a spotty manicure on. I’ve been meaning to do one for ages, and this week I finally got round to it!

I went for a pastel colours version: blue and yellow. This blue, Oxford from Nails Inc, has been a favourite for a very long time. The yellow came in the same set, and is called Wimbledon.

blue and yellow spotty nails - somanylovelythings

I used my one of my dotting tools to get the dots close to perfect (they never are!). Overall, a very easy mani to do, and very cute.

The polishes apply ok. As they are a bit on the old side, they stained a bit. I used two coats of the blue and three of the yellow.

blue and yellow spotty nails - somanylovelythings

Extra shine was given with the Seche Vite topcoat and durability is always fantastic with Nails Inc polishes!

Rating:

4_star

Nails of the week: Pink and blue marble

pink and blue marble effect nails - somanylovelythings

So I rebelled last time and went for a single colour on my nails (missed it? Read about the bright green nails here), but now I am back to my normal (?) self – and it is marble time again!

I find this easy marble so good; the effort is really small compared with the impact, so I just love it, and need to stop myself from doing it every week (even tops the gradients for “cost x benefit”).pink and blue marble effect nails - somanylovelythings

If you missed, I posted a short tutorial on my last marble nails. For this one I did exactly the same, with a wooden stick, but using the turquoise electric dreams from Collection, the pink sweet tart from Revlon and French white also from Collection, finishing with Seche Vite topcoat.

This was done to go with a dress I am wearing for a wedding, is has got water colour flowers in mainly pink and blue, and I am very pleased with the result – it looks girlie, candy like and the mix of colours is great. I even tried “bigger” movements to create different patterns on the marble effect!!!

pink and blue marble effect nails - somanylovelythings

Rating:

4_star

Nails of the week – bright green

bright green nails - somanylovelythings

Shock horror – this week I have a single colour on my nails!

And it is green- a bright, acid kinda halfway between lime and avocado green, with a lovely golden sheen to it (delivered by the addition of “special golden pearl”
to its fomula).

Sounds great, no? And it is. Pure and pretty. I was going to add stuff to it but decided not to, it shines on its own.

I am wearing the lovely limited edition green number 427, Amable Chartreuse, from Kiko’s Sun Pearl collection. Application was alright, the polish is a bit thick and it feels like the rush strokes will mark, but it settles nicely and they don’t. I am using two generous coats, but the polish is very pigmented. The finish is just lovely – shiny and intense. And it lasted very well.

As usual, Kiko delivers great value for money – this baby was only £2,40 on their sale!

Nails of the week: pink and purple gradient

pink and purple gradient nails - sonmaylovelythings

You may say “another gradient”? First, yes. I love them. Second, this one is a bit different; instead of doing it horizontally, I decided to do it vertically. Oh, yeah, the subtleties of life.

The technique was the same used before – sponging – and somehow I found this a bit trickier; getting the blending in the middle of the nail is quite hard! I really want to do a rainbow gradient, with different colours on all nails, and this was just a taster of how hard it will be…

I painted all my nails white (and for the first time, due to lack of time, had them like that for 24 hours – how 90’s, even though pure white nails is making a come back, it still takes me back to my teenage years!) then applied L’Oréal Color Riche Neon Pop nail polishes in Flashing Lilac and Acid Watermelon (pink).

Then I applied my all time favourite sparkling topcoat Electric Lane from Nails Inc and voilá!

pink purple gradient nails - somanylovelythings

Application was alright, both colours are pigmented enough not to make sponging a nightmare. My gradients usually last an awful long time, this one is 8 days and counting – just don’t want to remove it!

Rating:

5_star

Nails of the week: nude and colourful geometric

nude nails with colourful geometrical shapesThe L’Oréal Color Riche neon pop colours are so lovely that when I got the collection I couldn’t decide which colour to use first – so I went for all at once!!!

I love using a nude base and adding a splash of colour, and the collection lent itself nicely to that so I picked one of my trusthworthy nudes – Colorama Cipó, a very warm, tan beige  – to create this look.

I used normal sticky tape to create the lines (some a little bit wonky); it was the first time I did a variety of lines on my nails. I tried what I call the “asymmetrical French tip” before and chevrons, but always the same shape in all nails. I was quite pleased with the results, although for the thin line through the middle of the nail I will probably use a brush in the future!!!

nude nails with colourful geometrical shapes

Then I used the super bright Flashing Lilac, yellow Banana Pop, pink Acid Watermelon and green Wasabi Hint from L’Oréal’s Neon Pop collection (which I reviewed last week) to create the details.

Application was fine, all colours were solid enough to allow one coat for the detail and to cover the nude, as well as drying quickly. Durability was great – 8 days, no chips!

Rating:

4_star

Nails of the week: green marble with tutorial

Green marble nails

Always wanted to try marbling, but don’t really have time or patience for water marbling – just the thought of it makes me want to cry.

After obsessing over it in Brazil, where my manicurist gave them to me for the first time, I promised myself I would try the wooden stick marble myself – it seemed much more manageable than its water counterpart!

Well, I did, and I am chuffed with it! I woke up one morning obsessed with green (yeah, go figure!) so I used white (Collection 2000 103 French White), jade (Kiko 343) and mint green (Colorclub) to create this marble.

It didn’t tak me too long; I first applied a base coat on all nails and then started the marbling process one by one. It is important that steps 1-5 are done nail by nail, otherwise the bottom layers dry, the polish won’t mix and gaps will appear!

marble_tut

1. Apply a coat of the base colour in the whole nail (I used the jade green)

2. Apply a second coat of the base colour, but this time, apply generously – quite thick; a bit blobby even!

3. Put 3-4 drops of the other colours on it

4. Using a wooden stick or a toothpick, gently swirl it around as you please, creating different patterns and making sure you cover the whole nail

5. Clean the excesses (I use the same wooden stick, clean side)

6. Repeat on every nail

I then applied a topcoat and removed the excess using the wooden stick with cotton wool at the end, dipped in nail polish remover.

I love this. It took me 3 attempts on my thumb to get the hang of it, and the others were plain sailing. Just be careful not to rub the stick to hard and completely remove the polish, leaving gaps!

Application was much more straight forward than I though; and durability was ace – flawless for 7 days!

Rating:

5_star

Nails of the week: Pretty pastels

pastel nails - somanylovelythingsPastels… and to think at one point I would shun light nail colour in favour of dark ones… pah…What was I thinking?

Truth is, that lilac changed my life… and this week I went for a pastel colours manicure with a holographic glitter topcoat and bird details!

It had been a while since a painted each nail a different colour, so I thought it was tome I did it again: lilac from Miss Sporty (cannot see the number anymore!), pretty blue from Nails Inc, Oxford, pink from Kiko (376), green from ColorClub (no name or number on bottle, sorry!) and this amazing yellow from Nails Inc, Wimbledon. Add Nails Inc topcoat in Electric Lane and a couple of uber cute bird nail tattoos from Nail Art UK and voilà – spring ready nails!

Application was good, all applied evenly and with no streaking. Durability was great – 7 days perfection, no chips, then the cracks started to show; a couple chips in the pink and the birds lost a wing each. Tragic. As I am super busy with my essays, I just fixed the chip with a dot of polish and topcoat and filled the birds in with a Sharpie – gotta love it – to keep it going for a couple more days when I can finally do my nails. Desperate times, desperate measures!

Rating:

4_star

Nails of the week – silver and blue holographic gradient

holographic gradient nailsOh yeah, I have an obsession with gradients too… and this time, I used three linear holos to create this lovely gradient effect on my nails, in silver, blue and dark grey.

I kind of regret having added the dark grey; it would have been just as nice in silver and blue,plus the darker colour was less pigmented than the others, so at one point I really thought it wouldn’t work…

Work it did, and I was pleased with the result. This time, I applied only one coat of the all white coat, and it worked fine – less time waiting to sponge and less layers of nail polish. I used a silver holo from ColorClub and blue (Apolo) and dark grey (Zeus) holos from Specialittá Hits “No Olimpo” range, applying the sponging technique.

holographic gradient nails

Application, as mentioned, was a bit sketchy, but turned out ok in the end. The ColorClub holo takes aaages to dry. Durability, however, was fantastic: 14 days – yes you read it right – 14 DAYS with absolutely no chips (I skipped a week of doing my nails, partly for being lazy, partly because it looked so good I felt bad removing it!)

Rating:4_star