Nails of the week: pink and purple gradient

pink and purple gradient nails - sonmaylovelythings

You may say “another gradient”? First, yes. I love them. Second, this one is a bit different; instead of doing it horizontally, I decided to do it vertically. Oh, yeah, the subtleties of life.

The technique was the same used before – sponging – and somehow I found this a bit trickier; getting the blending in the middle of the nail is quite hard! I really want to do a rainbow gradient, with different colours on all nails, and this was just a taster of how hard it will be…

I painted all my nails white (and for the first time, due to lack of time, had them like that for 24 hours – how 90’s, even though pure white nails is making a come back, it still takes me back to my teenage years!) then applied L’Oréal Color Riche Neon Pop nail polishes in Flashing Lilac and Acid Watermelon (pink).

Then I applied my all time favourite sparkling topcoat Electric Lane from Nails Inc and voilá!

pink purple gradient nails - somanylovelythings

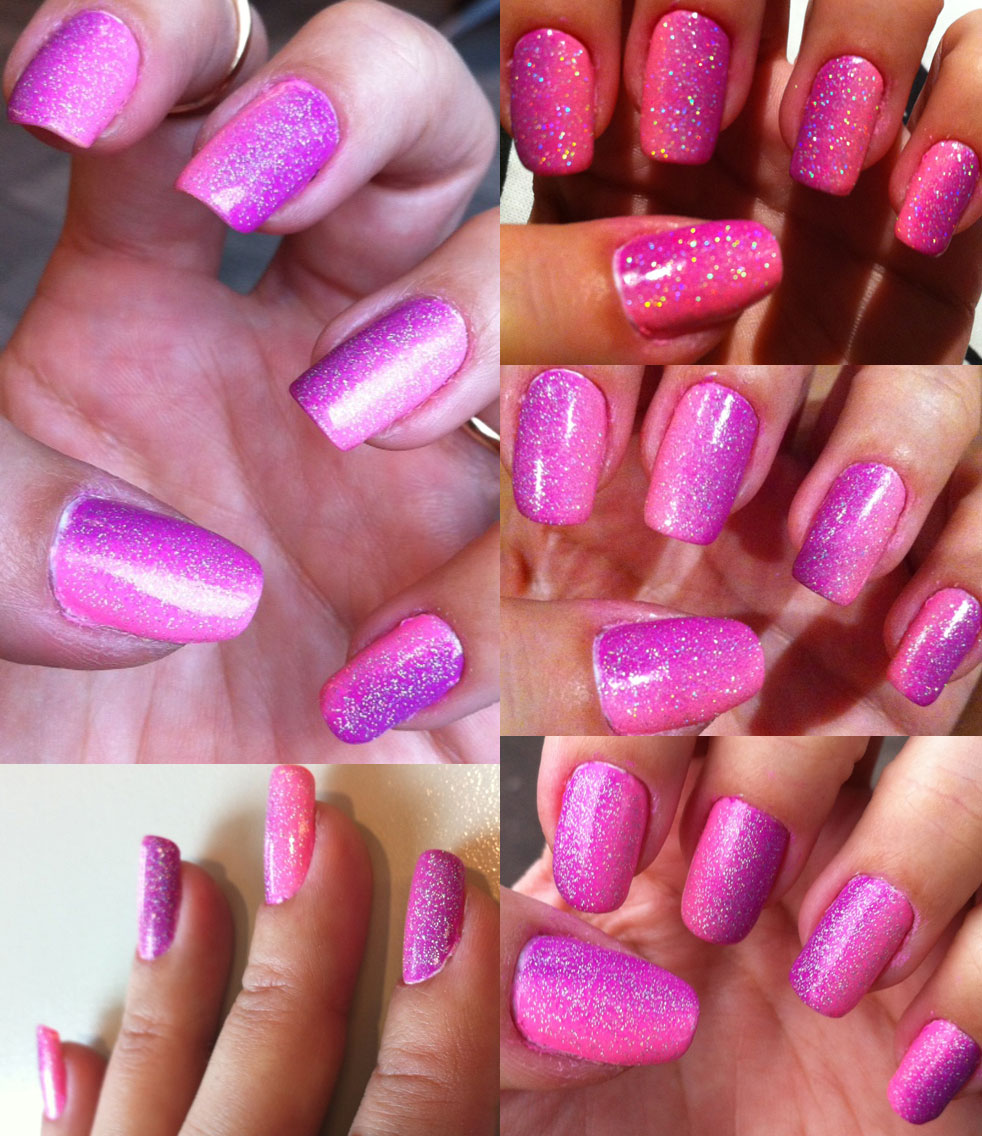
Application was alright, both colours are pigmented enough not to make sponging a nightmare. My gradients usually last an awful long time, this one is 8 days and counting – just don’t want to remove it!

Rating:

5_star

Nails of the week: nude and colourful geometric

nude nails with colourful geometrical shapesThe L’Oréal Color Riche neon pop colours are so lovely that when I got the collection I couldn’t decide which colour to use first – so I went for all at once!!!

I love using a nude base and adding a splash of colour, and the collection lent itself nicely to that so I picked one of my trusthworthy nudes – Colorama Cipó, a very warm, tan beige  – to create this look.

I used normal sticky tape to create the lines (some a little bit wonky); it was the first time I did a variety of lines on my nails. I tried what I call the “asymmetrical French tip” before and chevrons, but always the same shape in all nails. I was quite pleased with the results, although for the thin line through the middle of the nail I will probably use a brush in the future!!!

nude nails with colourful geometrical shapes

Then I used the super bright Flashing Lilac, yellow Banana Pop, pink Acid Watermelon and green Wasabi Hint from L’Oréal’s Neon Pop collection (which I reviewed last week) to create the details.

Application was fine, all colours were solid enough to allow one coat for the detail and to cover the nude, as well as drying quickly. Durability was great – 8 days, no chips!

Rating:

4_star

Nails of the week: green marble with tutorial

Green marble nails

Always wanted to try marbling, but don’t really have time or patience for water marbling – just the thought of it makes me want to cry.

After obsessing over it in Brazil, where my manicurist gave them to me for the first time, I promised myself I would try the wooden stick marble myself – it seemed much more manageable than its water counterpart!

Well, I did, and I am chuffed with it! I woke up one morning obsessed with green (yeah, go figure!) so I used white (Collection 2000 103 French White), jade (Kiko 343) and mint green (Colorclub) to create this marble.

It didn’t tak me too long; I first applied a base coat on all nails and then started the marbling process one by one. It is important that steps 1-5 are done nail by nail, otherwise the bottom layers dry, the polish won’t mix and gaps will appear!

marble_tut

1. Apply a coat of the base colour in the whole nail (I used the jade green)

2. Apply a second coat of the base colour, but this time, apply generously – quite thick; a bit blobby even!

3. Put 3-4 drops of the other colours on it

4. Using a wooden stick or a toothpick, gently swirl it around as you please, creating different patterns and making sure you cover the whole nail

5. Clean the excesses (I use the same wooden stick, clean side)

6. Repeat on every nail

I then applied a topcoat and removed the excess using the wooden stick with cotton wool at the end, dipped in nail polish remover.

I love this. It took me 3 attempts on my thumb to get the hang of it, and the others were plain sailing. Just be careful not to rub the stick to hard and completely remove the polish, leaving gaps!

Application was much more straight forward than I though; and durability was ace – flawless for 7 days!

Rating:

5_star

Product review: L’Oréal Color Riche Neon Pop nail polish

loreal colour riche neon pop

How exciting to receive a big box at home only to open it and find four lovely shades of nail polish and a lovely balloon, delivering a true colour pop to my day!

The L’Oréal Neon Pop collection for the Summer 2013  is a fusion of Tropicana brights with arty colour block palette – and bright they are, even though they are not your conventional neon colours; they really pop when applied!!!

(more pictures at the bottom of post!)

The colours here are a purple, called Flashing Lilac, yellow Banana Pop, pink Acid Watermelon and green Wasabi Hint.loreal colour riche neon pop

As seen above, from left to right, first is Flashing Lilac, which I found the sheerest of them all, definitely needs two coats, but delivers a lovely finish, almost gelish.

Banana Pop is very pigmented but sometimes you can see the brush strokes, you must apply carefully and they will go away! It is really the colour of a very ripe banana skin!

Acid Watermelon is probably the closest to a true neon colour and also very pigmented, one coat is almost enough for solid coverage.

Finally, Wasabi Hint I think is my fave, very pigmented and a very peculiar shade of green with great shiny finish.

I find the colours are very wearable, even for those who steer away from anything neon. I like the brush and drying time was standard. I did the swatches and also played around with the colours a little bit, as couldn’t help myself – they are so pretty!!!

I will be posting my look using the colours on a mani next week! Exciting!

They will be available to purchase this month!

And yeah, if you are wondering, the pretty balloon is from Bubblegum ballons! Soooo adorable, it is looking lovely in my sitting room!

This post contains PR samples. This review, however, is based on my own true experience with the products and reflects my honest opinion on them.

Nails of the week: Pretty pastels

pastel nails - somanylovelythingsPastels… and to think at one point I would shun light nail colour in favour of dark ones… pah…What was I thinking?

Truth is, that lilac changed my life… and this week I went for a pastel colours manicure with a holographic glitter topcoat and bird details!

It had been a while since a painted each nail a different colour, so I thought it was tome I did it again: lilac from Miss Sporty (cannot see the number anymore!), pretty blue from Nails Inc, Oxford, pink from Kiko (376), green from ColorClub (no name or number on bottle, sorry!) and this amazing yellow from Nails Inc, Wimbledon. Add Nails Inc topcoat in Electric Lane and a couple of uber cute bird nail tattoos from Nail Art UK and voilà – spring ready nails!

Application was good, all applied evenly and with no streaking. Durability was great – 7 days perfection, no chips, then the cracks started to show; a couple chips in the pink and the birds lost a wing each. Tragic. As I am super busy with my essays, I just fixed the chip with a dot of polish and topcoat and filled the birds in with a Sharpie – gotta love it – to keep it going for a couple more days when I can finally do my nails. Desperate times, desperate measures!

Rating:

4_star

Nails of the week – silver and blue holographic gradient

holographic gradient nailsOh yeah, I have an obsession with gradients too… and this time, I used three linear holos to create this lovely gradient effect on my nails, in silver, blue and dark grey.

I kind of regret having added the dark grey; it would have been just as nice in silver and blue,plus the darker colour was less pigmented than the others, so at one point I really thought it wouldn’t work…

Work it did, and I was pleased with the result. This time, I applied only one coat of the all white coat, and it worked fine – less time waiting to sponge and less layers of nail polish. I used a silver holo from ColorClub and blue (Apolo) and dark grey (Zeus) holos from Specialittá Hits “No Olimpo” range, applying the sponging technique.

holographic gradient nails

Application, as mentioned, was a bit sketchy, but turned out ok in the end. The ColorClub holo takes aaages to dry. Durability, however, was fantastic: 14 days – yes you read it right – 14 DAYS with absolutely no chips (I skipped a week of doing my nails, partly for being lazy, partly because it looked so good I felt bad removing it!)

Rating:4_star

Nails of the week – black with red glitter French manicure

black with red glitter French manicure - somanylovelythingsBlack and red, red and black… I cannot get enough. Definitely my favourite colours.

This week I had a wedding to go to, and was wearing a red (surprise!) dress, so decided to match my nails.

I used Colorama Black as base on all fingers except the ring one, where I applied the gorgeous Barry M glitter in red (seen in full glory here) as an accent. I used the same red to do the French mani on the black ones.

black with red glitter French manicure - somanylovelythingsI love it, really. The glitter tips just looked so pretty (the Barry M glitter polish is amazing!), and the black was so glossy (Seche Vite topcoat used!). Application was fine; two coats of each polish were applied. Durability was good; by the 6th day the glitter started to wear off from the tips, but a good run nevertheless.

Rating:

4_star

Nails of the week: orange and colour shifting glitter flakes

Orange glitter flakes nails - somanylovelythingsYou were warned there was going to be a flakie fest here… well, here is another one.

This flakie, suspended on a sheer light orange base is from Risqué, a Brazilian brand, and it is called Cobertura Encantada – enchanted coverage, in free translation, and it really is. I used on top of a gorgeous dark-ish orange, with a very discreet metallic sheen, called Garota Verão, from Colorama – and I have to say, this one needs to be worn alone, it is beautiful.

The glitter flakes, even on an lighter colour, shifted subtly from gold-green to orange-light red. I really liked it. Most of the time, they were just very shiny vivid gold, as seen on the pictures. I couldn’t quite capture the shifting :(. I saw some pictures of it over black and it is amazing… but I am sooo tired of wearing flakie over black; they end up looking quite similar…

Application was alright; smooth. I used two coats of Garota Verão (could have done with one, really  – it is very pigmented), and three of the glitter topcoat – it is not the most saturated flakie I have ever seen, but three coats created a good coverage.

Durability was ace and I was very happy with this one, nothing too exceptional, but nice. Overall, a good combo!

Rating:

3_star

Nails of the week: blue and green glitter flakes

Flakies!!! My obsession is truly at full steam after I got back from Brazil with a suitcase full of flakie polishes!

This week, I tried this green and blue shifting glitter flakes polish, from a brand I didn’t know before – Sancion Angel. This is from their Jóias do Nilo collection and is called Cipreste. It is well saturated of flakes and they have  great shifting – looks really pretty! I applied two coats over two coats of Colorama Black, a pure shiny, well, you guessed, black!

Blue and green glitter flakes nails - somanylovelythings

Application was easy and durability was great. I am glad I liked the brand, as I have other four flakies to try! Cannot wait!

Rating:

4_star

Nails of the week – metallic green, blue, mauve marble

I told you I was going to have marbling done on my nails again…

This time, I went for a lighter base, Close, a metallic greenish aqua with some gold hints, then my lovely manicurist in Brazil, Irma, added Dancer, the metallic dark blue and Gaia, the metallic mauve, all from Brazilian brand Naty.

green, blue, mauve marble nails

She used the same technique as before (see my previous post), with the wooden stick, and the patterns are really lovely!

I then got my toe nails painted with Gaia – I love it!

Durability was great, and in a few weeks I will try it myself…

nails and toenails, nail polish bottles - somanylovelythings

Rating:

5_star