Product review: L’Oréal Paris Skin Perfection Advanced Correcting Serum

L'Oréal Paris Skin Perfection Advanced Correcting Serum

Boy, do I love a good serum. Because of my problematic skin history, I avoid very rich nice moisturisers. To make sure I give my skin the hydration it needs, I top it up with a lovely serum. And the serum du jour here at So Many Lovely Things is the L’Oréal Paris Skin Perfection Advanced Correcting Serum.

First, I am gonna give you the facts: this beauty is aimed at people in their 20’s and 30’s and contains LR 2412 which is derived from Jasmonic Acid and already being used in high-end products from the L’Oréal family for more mature skin, in higher concentrations.

This ingredient is combined with Perline-P, which is composed by a plant derived sugar (which is said to reduced the appearance of pores), a potent but gentle on the skin exfoliant (HEPES) and a bark extract, which helps to soothe the skin and reduce redness. This combination of LR 2412 and Perline-P should tackle pores size, uneven skin tone and texture, showing visible improvements.

L'Oréal Paris Skin Perfection Advanced Correcting Serum

The shot didn’t capture how pretty the pink in this serum is!

Now, I tried Lancôme Visionnaire for 2 weeks and really loved it. The Skin Perfection serum has a very similar effect on my skin – I also felt it on the first application. Applied at night, I wake up with suppler, plumped skin, looking rested, brighter.

Two weeks on, I noticed the general aspect of my skin is better, make-up sits much better, even my scars seem less visible. It is worth noting that Visionnaire contains the L’Oréal patented exclusive ingredient LR 2412 at a 4% concentration, so double the Skin Perfection concentration.

The products colour is the very same – a pearly milky white with a gorgeous translucent shimmery pink when you smooth it over. It smells lush too. The skin feel very satiny after application.

My skin is loving it. I am also using others product from the range, the day moisturiser (which I will review soon) and the toner.

To make all this even better, Superdrug has an amazing promotion on the range at the moment, the serum was only £11.32, but even at full price, this is a bargain (RRP £19.99, full price listed at Superdrug is £16.99). You can also find it in Boots and other retailers nationwide.

Obviously, I will keep using this, and will certainly re-purchase. With such a problematic skin, you really need to hang on to what it likes!

For more information on the Advanced Correcting Serum, visit the L’Oréal Paris website.

This post contains PR samples. This review, however, is based on my own true experience with the products and reflects my honest opinion on them.

What I’ve been wearing – 03/10/2013

I haven’t posted one of these for a while – a month to be precise, so have a huge backlog of outfits crying to be published…. going back in time, I can still spot a few hints of summer in my outfits. Now, my wardrobe has completely morphed into autumn…

Outfit #1

Cherry dress - somanylovelythings

Cherry dress from Louche at Joy, white cardigan from Primark, black and white court shoes from Viviana shoes.

Outfit #2

Dark denim dungaree dress dress - somanylovelythings

Dark denim skirt dungarees from Primark, blue and grey leopard print top from H&M, ankle boots from New Look, necklace from H&M, rings from Primark, H&M, Topshop and Forever21.

Outfit #3

Pink, white and black panel top - somanylovelythings

Pink, white and black leather look panels top from Primark, black leggings from American Apparel, black court shoes from Christian Louboutin, necklace from New Look, rings from Accessorize (big grey stone), H&M, Disney Couture and Forever21.

Outfit #4

Yellow and cream dress - somanylovelythings

Pretty yellow with cream dots dress from Primark, nude peep toes from Jimmy Choo, rings from H&M and Forever21.

Outfit #5

tartan skirt - somanylovelythings

Holiday clubbing look! Yay! Black off the shoulder crop top from Miss Selfridge, red and black tartan skirt from H&M, black strappy sandals from New Look, black clutch from H&M, neckalce and bracelet from New Look,  rings from H&M, Topshop, New Look (but you can’t see them!)

Product review: Naked Brunette Radiance Shampoo and Conditioner

Naked Brunette Radiance shampoo and conditioner

As I love discovering new brands and products, I was thrilled to be sent the Naked Brunette Radiance shampoo and conditioner to try – I cannot believe I had not come across the Naked brand before!

Naked products are 97% natural, made with botanical products – which is great – and they have an extensive range of caring beauty and hygiene products, not only haircare.

The shampoo is light brown in colour, has elderberry and sage to give brunette hair that extra boost. The bottle is made with 50% recycled materials and recyclable, of course!

Naked Brunette Radiance shampoo and conditioner

The smell is very mild and nice, plant-like, very fresh. It lathers alright (I wasn’t expecting it to – it is actually very good for a sulphate-free shampoo) and the second application is even better. It feels a tiny bit tingly, like mint, which I like! My hair felt very clean, my scalp refreshed.

The conditioner is white with a creamy consistency and smells plant-y too! I applied on my hair and left it for a couple minutes before rinsing. It feels very fresh, and the hair felt soft. The tube is 100% recyclable!

My hair dried very soft, shiny and light – I am very pleased with this duo!

Packaging is simple and functional. I like their logo and the text on the back of the products. Both shampoo and conditioner contains no parabens,sulphates, phthalates or petrochemicals; are not tested on animals, are suitable for vegetarians and vegans and made in the UK.Naked Brunette Radiance shampoo and conditioner

At the moment, the new Naked Brunette Radiance shampoo and conditioner are on special offer for only £2.66 each (normal price £3.99 for 250ml) on the Naked website, where can find these two and many other products, including bath, body, shower, kids and baby ranges!

Product review: Lancôme Hypnôse Drama Eyes smoky eyes palette by Alber Elbaz

lancome by Alber Elbaz smoky eyes palette

There is no way of resisting this palette for a lover of all things pretty. Although the colours are not new for Lancôme, the pretty dotty packaging created by Alber Elbaz for this five-colour Hypnôse Drama Eyes smoky eye palette is. And yes – I am a sucker for packaging.

More than a that, I am an ultra-sucker for black eye shadow. A black smokey eye is my favourite look. I would wear it everyday. You read it right. DAY. Plus, as a wearer of red lipstick, black is pretty much the only smokey I can get away with. There you have it.

lancome by Alber Elbaz smoky eyes palette This palette comes with five very wearable shades: a very pearly pink, a light silver grey, a metallic charcoal, a very dark charcoal with silver particles and a satin pure black. What a selection!

I created this look using all but the pink colour in the palette. It was an “Ibiza clubbing eye make”, hence the over the top crystals.

Black smokey eyes with crystals -somanylovelythingsApplication was alright, the colours are super pigmented and look great when applied. You can also use them wet for extra impact. Dry they are extremely blendable. The only problem I found with it is that the darker colours drop an awful lot when applying, so if going bold, do eyes first then skin. Or hang tight to tissue under the eye. Once it drops, it really sticks.

Black smokey eyes with crystals -somanylovelythings

Not only it looked fantastic but it also lasted well, so this is a palette which will be accompanying me in many nights out!

Love it.

Olympia Beauty 2013

olympia beauty 2013 - somanylovelythings

This was my second time at Olympia Beauty. Just the idea of  over 520 beauty exhibitors under one roof is enough to make me forget how much I have walking around in crowds!

The show is free for professionals and I registered as press. On the day tickets for the general public can be bought on the day for £15.

This year the show didn’t disappoint. I was particularly impressed with their Press and Social Media Hubs – much bigger and better than last year’s, with more brands showcasing products – OPI, Dermalogica, Elemis, Lash Perfect/Hi Brow, Sienna X amongst others and a spacious area with refreshments (including cute Marc Jacobs Diet Coke bottles!)

The stands were fantastic! This year, a lot of gel manicures again, but also for domestic use and teeth whitening I think were the bigger presence for consumer products. Lashes and brows were also quite predominant!

Exhibitors were great – from huge brands for consumer (OPI, Elemis, Dermalogica, Ardell, Color Club, Essie, Fake Bake, Minx nail foils, NYX and many others!) offering discounted products to salon equipment and therapies machines to the professionals, and lots of and sample therapies going on.

I was very happy to se a bit more make up – Inglot and Illamasqua making an appearance. Although I was disappointed with Illamasqua – they were not selling products!

As usual, they held competitions – Nailympics – the international nail competition, The Art of Make-up and The Art of Body Painting.

The educational part of the show was even bigger too and was divided in “Business of Beauty”, “The Creativity of Nails”, “The Art of Make-up”, Make-up Artist Guest Stage” and “Aesthetic Beauty”, covering an amazing amount of topics around beauty and therapies.

As a blogger, it is great to get direct contact with brands. As a consumer, it is fantastic to pick up lots of great products at a very good price. As a beauty lover, and amazing opportunity to see what is going on in the market. It’s an overall win!

Needless to say, I came home with  bunch of products that will soon be gracing the blog – fun times!!!Always a pleasure to go, and I will for sure be there in 2014!

Product review: Stargazer Sexy Eyes temporary eye tattoo

stargazer temporary eye tattoo lace and bows - somanylovelythings

It is no secret I love my eyes BIG. The bigger and blacker, the better. Recently, I even attempted a crystal look (which I will come to in due time!) but today I tried Stargazer’s temporary eye tattoo Sexy Eyes in Rose and Bows.

stargazer temporary eye tattoo lace and bows - somanylovelythings

Should’ve stopped the cutting there, but nooooo…

And sexy they are. I really loved it. Application was dead easy. I must confess I did mess one up, but not applying – cutting! It will make sense soon, I promise!

You probably applied a temporary tattoo on yourself or somebody else; applying this is exactly the same – simply remove the transparent film and put that side you just removed the film from on to clean skin. Make sure you position it in the right place and gently dab a water-soaked cloth over the paper – make sure you don’t miss any bits. After the whole area is wet, wait 10 second and gently peel the white paper. Voilá. Gently dab the damp cloth over the design again.

stargazer temporary eye tattoo lace and bows - somanylovelythings
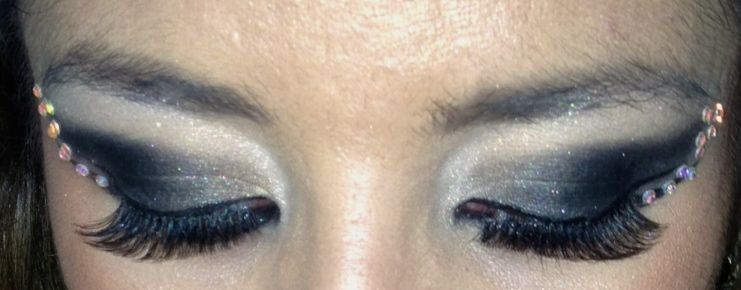
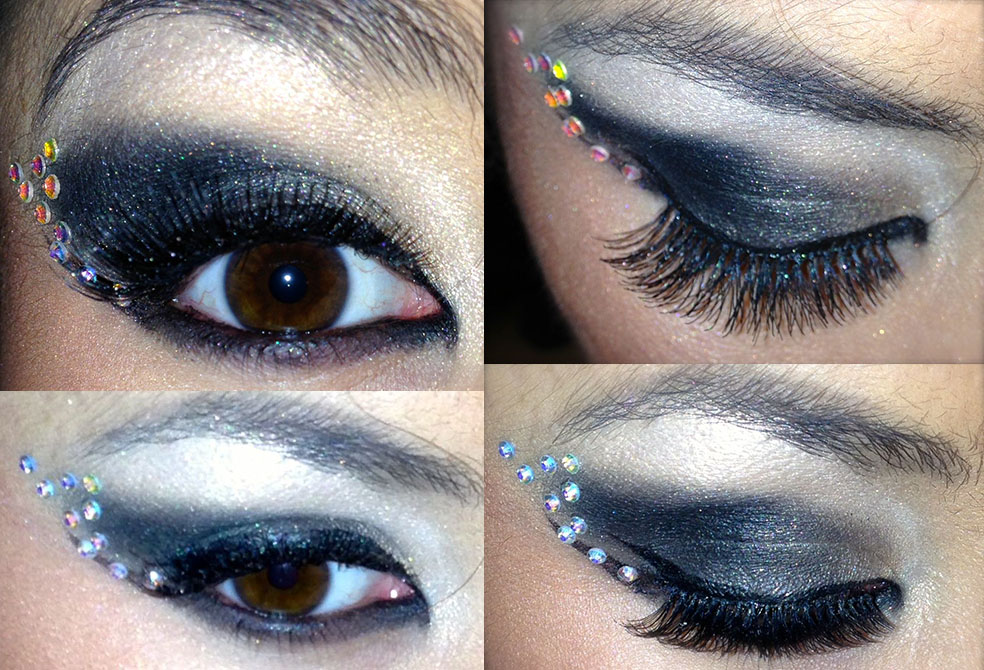
It dries pretty quickly and feels great on the skin. I was worried it was going to pull after it dried, but it didn’t; I couldn’t even notice it was there. I filled the gap between my lash line and the tattoo with black and gold liner to complement the look.

Now, with Halloween just around the corner, if you are thinking about an amazing eye design that is very easy to achieve, look no further. This product is fantastic to complement pretty much any costume and they have many designs for you to choose from – all eyes here on Flame!!!stargazer temporary eye tattoo lace and bows - somanylovelythings

It is also a great alternative to masks for a masquerade ball – dare to be different and still very sexy, without having to carry the extra weight on your face (and hands once you get bored, the mask starts itching, you are fed up of not having peripheral vision… and the list goes on!).

You can add more details or extend the design using liquid eyeliner to create an even more intricate design.

Apart from that, this is also great for occasions when you want to go all out. I would probably cut it up smaller for a night out, but would definitely use it (I actually have another set – it is waiting for the right moment!)

And a little secret: this tattoos are very versatile – you can cut them up in at least three different places to create a more discreet effect. You can use it only on the lid or with a slim or large flick. Great!!!

stargazer temporary eye tattoo lace and bows - somanylovelythings

A few ways of cutting it for a great effect!

Removal was much easier than I thought – I used an oily make-up remover (Lancôme Bi Facil) and it came out with no vigorous rubbing. Thumbs up.

The best of all (yes, there is something almost better than all that): it only costs you £4. Yes. Four British pounds per set. Do not wait.

You can get these lovelies at the Stargazer website – do check all the designs, they are beautiful!

This post contains PR samples. This review, however, is based on my own true experience with the products and reflects my honest opinion on them.

Nails of the week: red with leopard print

red and leopard print nail art - somanylovelythings

If you know me, you will know I have more than a soft spot for animal print. I just can’t stay away from it. Finally, I braved into doing something I wanted to do on my nails for a very long time: leopard print spots.

I am very surprised it took me this long. I thought it would be very difficult so always gave up before starting. Little did I know it was going to be quite easy and I would be very pleased with the results of my first attempt – amazingly with no huge mistakes!!!red and leopard print nail art - somanylovelythings

Red nail polish is my first and true nail colour passion. For me, there is no better colour on my talons. So I used one of my favourite reds, Colorama’s 40 Graus, a vivacious and shiny orangey red. I applied two coats and let it dry for about an hour.

red and leopard print nail art - somanylovelythings

I then used Barry M Foil Effects nail polish in gold (another favourite of mine!) with a fine brush to create the spots in only half of each nail and finalised with Barry M’s nail art pen in black. This pen is great, fine, precise, fiving just the right amount of polish, so making the dark marks around and between the spots was a breeze. Applying with the left hand was a bit more challenging, but it worked well! I am thrilled with the result. After I let it dry for a few minutes, I applied a topcoat.

Truly in love, I feel these nails are really me.

colorama 40 graus and barry m nail polishes, nail art pen - somanylovelythings

Rating:

5_star

Product review: Simple eye make-up corrector pen

simple eye make-up corrector pen - somanylovelythings

Even for proficient hands, we all know it is still hard to create the perfect eye liner flick. With me, when it goes wrong, it is always one side. It’s wonky. It’s too long. It’s off-centre. Well, Simple to the rescue with their magical wand: the eye make-up corrector pen.

The best use is indeed to fix the eyeliner: not only the flick but also the fatter-then-I-wanted line.

It is also a great weapon for all of you that haven’t yet mastered the art of applying eyeliner (although is almost intangible, really, I use it everyday and consider myself very good with it, but some days it goes wrong. There is no other way about it.). Instead of causing an even bigger mess, this little beauty wipes off the memories of that mistake and gives you the much needed fresh break.

simple eye make-up corrector pen - somanylovelythingsThe precise tip offers detailed correction. It is dead easy to use – but always remember to old the pen upside down for 10-15 seconds before use and clean the tip after using, for optimal results. Cleaning the tip (I used a bit of tissue) is very important especially if you are removing black eye liner – you gotta do it between strokes, otherwise diluted liner will transfer onto your face. having said that, the smudges were easily removed by pressing my finger on it, so very easy!

simple eye make-up corrector pen - somanylovelythings

What a tool for any make-up bag – especially on those days you top up make-up after work in the office – eyeliner is bound to go wrong when you are in a hurry.

Retired are my cotton buds+eye make-up remover for small fixes. This is the thing. It will also help you with that cut precise look on smokey eyes. Just swipe at a 90 degree angle from the outer corner and voilá. Hello sharp, defined shape.

Also, if you sneeze after applying mascara (who never?), this will help you get rid of the mess without interfering with the make-up!

It contains no alcohol or oils, no fragrance and vitamin B5. It’s a little make-up miracle for just under £5. You can get more information about the Simple eye make-up corrector pen on the Simple website. You can buy it from retailers nationwide!

This post contains PR samples. This review, however, is based on my own true experience with the products and reflects my honest opinion on them.

Nails of the week: metallic neon yellow

20130915-164750.jpg

This week I decided to try this acidy, bright metallic neon yellow from Star Gazer. With weather this miserable, I needed something to brighten up my days!

I had never tried their polishes before. I found this number 102 quite sheer. Having said that, two coats gives an alright coverage and three is enough to make it quite solid, although I can still see through my nails against light, which is not really a problems.

20130915-164755.jpg

It doesn’t disappoint as a neon, it is beautiful! In direct light it looks great, it almost has a neon “aura” to it, reflecting light very well. It was surprisingly good to apply, given that light metallics are usually a bit painful for brush strokes – they are there, but very little.

It dried pretty quickly and lasted well! The only thing is that I rarely use one single colour on my nails, so changed pretty quickly – you know me! But overall, a good colour in a good polish.

Worth remembering these polishes sell for only £2.50 to 3.00 – yes, you heard it right!!! BARGAIN alert! And they have a multitude of AMAZING colours!

You can find more information about Star Gazer nail polishes on their website. There is a UV topcoat I just need to try! They also have an extensive range of make-up!

20130915-164801.jpg

As I am not a plain colour nail kinda person, I ended up adding a topcoat – the chosen one was Confetti from L’Oréal.

20130916-105500.jpg

Rating:

4_star

This post contains PR samples. This review, however, is based on my own true experience with the products and reflects my honest opinion on them.

Product review: L’Oréal Paris Super Liner Brow Artist

loreal brow artiste - somanylovelythings

This little pencil from L’Oréal has everything you need to create a sharp, strong eyebrow; yes, I am talking about the new eye brow liner Super Liner Brow Artist.

The double ended pencil is one side brow pencil, the other side setting wax, with a neat brow brush on the cap. Very practical.

loreal brow artiste - somanylovelythings

I’ve been filling in my brows for quite a few years now, and whereas the first time I had it done I found it really odd, now I find there is something missing in my face if I don’t. It really frames your eyes, drawing attention to then – a nice arch will also open up the eye.

loreal brow artiste - somanylovelythings

The pencil side

I am using the 03 Brunette colour and it suits me very well. It makes creating a strong, sharp brow easier. The brow pencil is soft and well pigmented so it took me sometime to get used to making lighter strokes. If you are looking for a super statement brow, then this is your tool.

loreal brow artiste - somanylovelythings

The wax side

First, you fill the brow on the desired shape – I follow my natural shape, which is quite thick but sparse in terms of hair – I quite like it, and filling makes it very nice. Then, you use the brush to tidy it up and soften the colour. Finally, you set with the wax side of the pencil, especially around the edges, to stop it smudging and keep he hairs in place.

The durability is great and the effect is fantastic.

It costs less than £6 from various retailers in Fair Blonde, Blonde, Brunette and Dark Brunette and you can get more info about it on the L’Oréal Paris website, where they also have very useful how-to guides!

This post contains PR samples. This review, however, is based on my own true experience with the products and reflects my honest opinion on them.