Nails of the week: Rainbow gradient

rainbow gradient nails - somanylovelythings

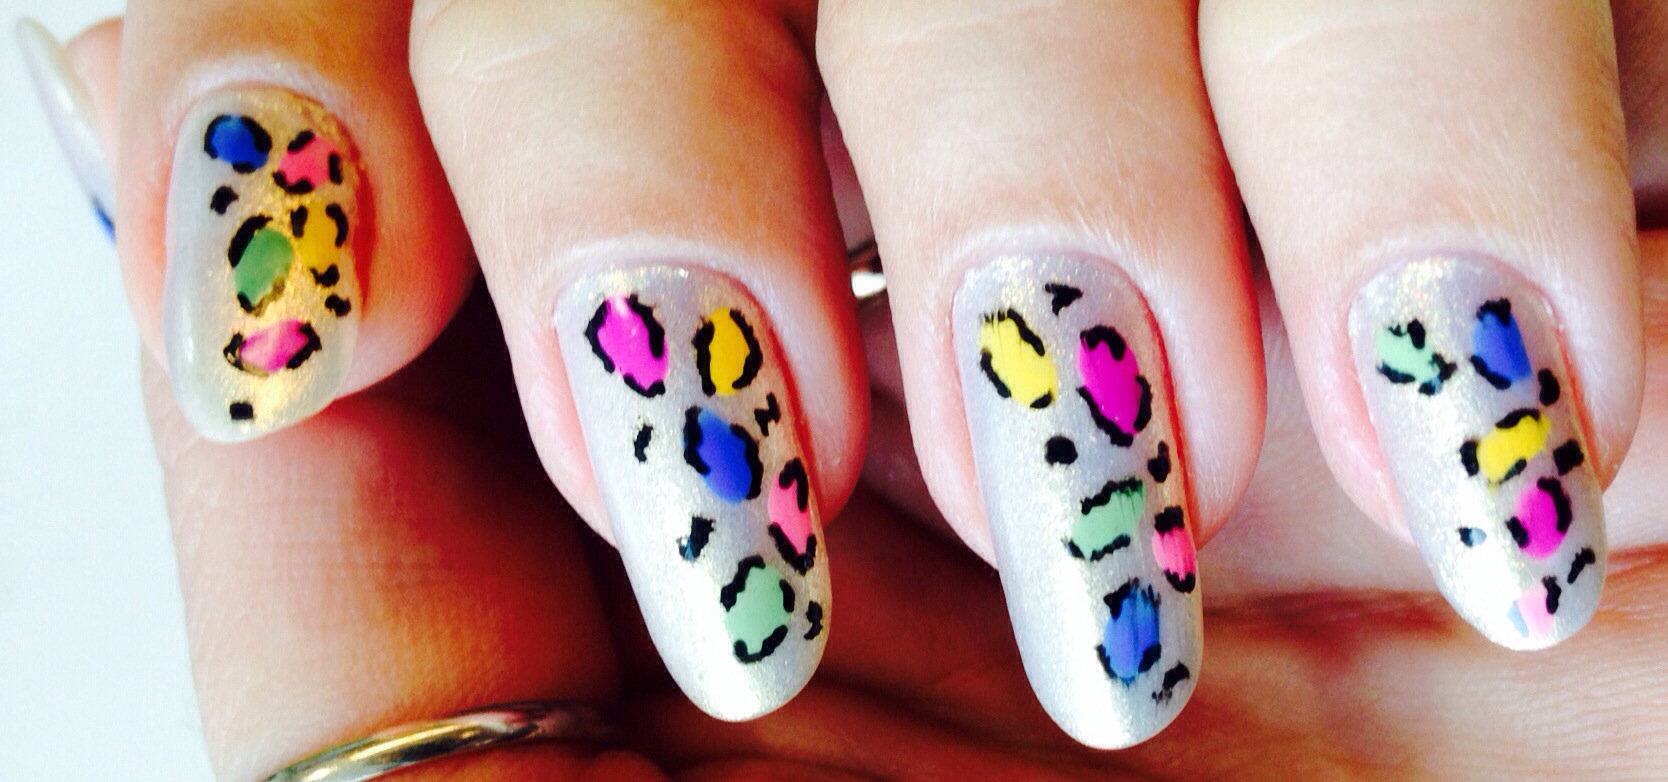
It is no news I love a gradient on my talons, so this week I went a bit further – a four colour rainbow gradient.

The last one I did was a long time ago, and this was due. After seeing a rainbow gradient on some Brazilian nail polish Facebook page, I decided that was going to be the next one.

rainbow gradient nails - somanylovelythings

The technique is the very same I used before: sponging, and I found it a bit more challenging with four colours to make sure all nails had about the same amount of each and that the transition was smooth. But it happened in the end!

rainbow gradient nails - somanylovelythings

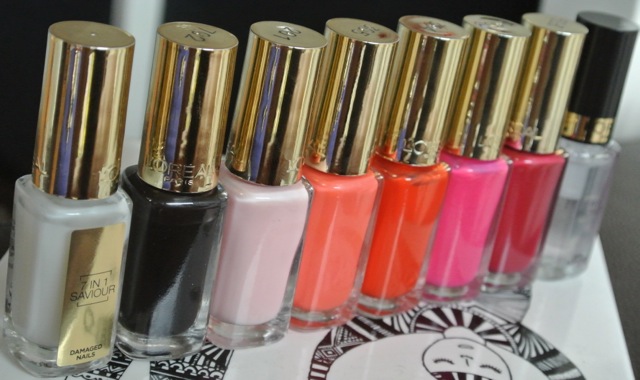
I used Colorama’s 40 Graus (red), L’Oréal Banana Pop (yellow), Kiko 385 (blue) and 343 (green), applied a stripe of each to a wet make-up sponge and stamped to previously painted white nails. I went round three times! I then added the magical Electric lane holographic topcoat from Nails Inc and a clear topcoat(Seche VIte) to seal it all.

rainbow gradient nails - somanylovelythings

To be honest, before I did it, I thought it was going to be a bit too much. It turns out I love it and don’t want to take it off. At all. Seven days have gone by and it still looks perfect and I am struggling with the idea of removing it and moving on to the next mani…

rainbow gradient nails - somanylovelythings

Rating:

5_star

You may also like:

Pink and purple gradient manicure

Pink and blue marble

Warm tones with French manicure

Nails of the week: colourful leopard print

colourful leopard print nails - somanylovelythings

You probably know by now I obsess about things. After loving last week’s leopard print soooooo much, I decided to do another one, of course. I went for a lovely white/gold base and my leopard spots were very colourful!

First, I am going to say how much I love the OPI Ski Slope Sweetie, which I picked up at Olympia Beauty. It is part of OPI’s winter collection and the colour is just amazing – a metallic white base with some colour shifting from a shimmery gold with a tiny little spark of green and red sometimes to a colder white, almost silver. Stunning. Seriously, rarely do I fall in love with a light coloured polish, but this got me. I sense it being used more – it is and amazing base for art: non intrusive but so not boring! It applies alright, there were no bush marks – the OPI brush is great, but this polish is a bit on the thick side.

20131005-211114.jpg

After applying two coats of SSS and letting it dry for about 15 minutes, I drew the spots with a fine nail brush and normal nail polish – I first did all blue (Kiko 385) spots, then purple (L’Oréal Flashing Lilac), green (L’Oréal Wasabi Hint), yellow (L’Oréal Banana Pop) and pink (L’Oréal Acid Watermelon),  making sure they were well distributed and no nail had the exactly same pattern!

20131005-211041.jpgAfter that, I used Barry M’s Nail art pen (seriously, how did I have this at home for soooo long and never used? Love this thing!) to add the irregular black outlines and random flecks to the spots.

I finished it off with a topcoat (Seche Vite) and I am absolutely in love with it. Sooo pretty!!!

colourful leopard print nails - somanylovelythings

Rating:

5_star

Nails of the week: red with leopard print

red and leopard print nail art - somanylovelythings

If you know me, you will know I have more than a soft spot for animal print. I just can’t stay away from it. Finally, I braved into doing something I wanted to do on my nails for a very long time: leopard print spots.

I am very surprised it took me this long. I thought it would be very difficult so always gave up before starting. Little did I know it was going to be quite easy and I would be very pleased with the results of my first attempt – amazingly with no huge mistakes!!!red and leopard print nail art - somanylovelythings

Red nail polish is my first and true nail colour passion. For me, there is no better colour on my talons. So I used one of my favourite reds, Colorama’s 40 Graus, a vivacious and shiny orangey red. I applied two coats and let it dry for about an hour.

red and leopard print nail art - somanylovelythings

I then used Barry M Foil Effects nail polish in gold (another favourite of mine!) with a fine brush to create the spots in only half of each nail and finalised with Barry M’s nail art pen in black. This pen is great, fine, precise, fiving just the right amount of polish, so making the dark marks around and between the spots was a breeze. Applying with the left hand was a bit more challenging, but it worked well! I am thrilled with the result. After I let it dry for a few minutes, I applied a topcoat.

Truly in love, I feel these nails are really me.

colorama 40 graus and barry m nail polishes, nail art pen - somanylovelythings

Rating:

5_star

Nails of the week: metallic neon yellow

20130915-164750.jpg

This week I decided to try this acidy, bright metallic neon yellow from Star Gazer. With weather this miserable, I needed something to brighten up my days!

I had never tried their polishes before. I found this number 102 quite sheer. Having said that, two coats gives an alright coverage and three is enough to make it quite solid, although I can still see through my nails against light, which is not really a problems.

20130915-164755.jpg

It doesn’t disappoint as a neon, it is beautiful! In direct light it looks great, it almost has a neon “aura” to it, reflecting light very well. It was surprisingly good to apply, given that light metallics are usually a bit painful for brush strokes – they are there, but very little.

It dried pretty quickly and lasted well! The only thing is that I rarely use one single colour on my nails, so changed pretty quickly – you know me! But overall, a good colour in a good polish.

Worth remembering these polishes sell for only £2.50 to 3.00 – yes, you heard it right!!! BARGAIN alert! And they have a multitude of AMAZING colours!

You can find more information about Star Gazer nail polishes on their website. There is a UV topcoat I just need to try! They also have an extensive range of make-up!

20130915-164801.jpg

As I am not a plain colour nail kinda person, I ended up adding a topcoat – the chosen one was Confetti from L’Oréal.

20130916-105500.jpg

Rating:

4_star

This post contains PR samples. This review, however, is based on my own true experience with the products and reflects my honest opinion on them.

Nails of the week: vintage inspired nude and red heart tips

vintage inspired nails - somanylovelythings

For a very long time I wanted to try this lovely manicure. But I ALWAYS had square shaped nails, since I can remember. And this “heart” tips don’t really look good on a square nail, after all, no hearts have a square bottom, right?

Not sure why but I woke up one morning really feeling like changing the shape of my nails and I took the plunge and filed them on to this oval-pointy shape. Have to admit the first 24 hours were quite odd, and I still feel they are more fragile than before….

I used the beautiful (probably one of the prettiest nudes ever) L’Oréal Paris Color Riche Macaron Noisette nude as a base and after two coats used Spicy Orange, a very orangey red (or reddish orange?!) to create the effect.

vintage inspired nails - somanylovelythingsI did a bit of practicing the days before on naked nails and found the easiest way for me. First, with a nail art brush, I marked with a small line the middle of each nail on the tip and then using the polish brush itself, touched the end of the brush away from the centre on both sides of the tip, as if drawing a V with sticks, creating the shape. It does help that the L’Oréal brush is rounded at the end, so perfect for this design – it really cut out my work and It was actually much easier than I thought.

I am thrilled with the final result, love it and the shape is actually growing on me, although I feel sometimes I have claws!

Rating:

5_star

Nails of the week: Red hearts

girlznailz random hearts wraps - somanylovelythingsI ❤ hearts. Sorry, I couldn’t resist! The fact is I do, so when I got the heart nail wraps from Girlz Nailz I knew I was going to fall in love.

These wraps have a lovely red metallic hearts in different sizes on a white background – love the white background, btw! I used the wraps to create two accent nails in each hand – on my thumb and my ring finger.

I found that their sizing didn’t quite match all my nails, but I could’ve easily cut them slightly to fit, as there are plenty of wraps in each packet. I have mentioned this to the company and they said they will look into the sizing, which is brilliant.

As on my previous use, these wraps applied really well, I heated them up a bit with the hair dryer and carefully applied them to clean, buffed nails. I achieved a crease free finish in a few minutes.

girlznailz random hearts wraps - somanylovelythings

This time, durability was even better, 4 days looking good and on the 5th day ragged edges started to bother me – still great going for wraps – so I removed them by peeling the raggedy edges and pulling with tweezers, then using nail polish remover to take off the little bit

The other nails were painted with the gorgeous Kiko Sun Pearl nail lacquer in Chilli Pepper red – this colour is lovely, with some amazing golden hints all over, just lush! Sadly it is a limited edition and not available on the site anymore, I picked it up from a bargain bucket in the shop!

Overall, a lovely mani. These wraps are great!

You can get the Random Hearts nail wraps and browse other cute and fierce designs at the GirlzNailz website.

Rating

4_star

This post contains PR samples. This review, however, is based on my own true experience with the products and reflects my honest opinion on them.

Nails of the week: black and berry colours marble

nail marbling - somanylovelythingsI decided to use a dark colour as a base for marbling this week. I do prefer the lighter colours, as the contrast is better, but wanted something a little bit different.

Using a whole lot of L’Oréal Paris Color Riche shades ranging from very light milky pink to bordeaux, I went for a black base and and ombre effect for the marble – seems like there is a lot going on but was actually quite simple.

nail marbling - somanylovelythings

I used Black Swan and from pinky to thumb, Rose Paradis, Dating Coral, Spicy Orange, Shocking Pink and Addictive Plum, as well as L’Oréal 7 in 1 Saviour as base coat and 2-in-1 Protect as topcoat – all from the L’Oréal Nail masterclass Pick n’ Mix!

nail marbling - somanylovelythings

I was very happy with the results; Dating Coral and Shocking Pink fared particularly well with the black. Durability was very good too!

Rating:

4_star

Nails of the week: blue with silver dots

dielle nail polish in modern goddess - somanylovelythingsNow the dotting tools are out, I cannot stop! This week I tried a vintage inspired mani, but failed. Miserably. It looked awful. So I decided to take a step back and simplify.

Took the opportunity to try the beautiful Dielle nail polish in Modern Goddess, a deep midnight blue, glittery (but with no texture), with hints of purple, part of their metallics collection.

dielle nail polish in modern goddess - somanylovelythings

I had never tried Dielle’s polishes before. The packaging is rather nice and the brush applies well. The colour is well saturated and application was smooth and dried quickly. I am using two coats. They also have a non-toxic formulation, free from toluene, formaldehyde, DBP, camphor, & pthalic acid.

I then added three dots to the side of each nail using Barry M’s foil effects in silver. Durability was very good!

If you want to try their polishes, go to Dielle’s website – they have really great colours and nice kits! You can get Dielle’s Modern Goddess here.

This post contains PR samples. This review, however, is based on my own true experience with the products and reflects my honest opinion on them.

L’Oréal Paris new Color Riche Glitterati polishes launch and nail masterclass

Loreal color riche gliteratti nail polish

When it comes to my blog, a few things are more exciting than an event entitled Nail Masterclass, especially if it is with L’Oréal Paris.

The event took place in central London and a few bloggers had the chance to try the new Color Riche Glitterati collection and the Nails à Porter fake nails, learn to create a couple designs with L’Oréal’s nail expert Grace Humphries and find out more about L’Oréal’s new Nail Art website, nail-art.com, a portal where you can find the latest nail trends and expert tips.

Nail-Art.com

click on the image to enlarge

Nail-Art.com is full of advice, news, tutorials (easy to follow!) and has the colour expert, which is a tool where you can choose a colour and a level of difficulty and be presented with nail art ideas. They also have an app called the Color Genius, which helps you find the best make-up and nail colour for your outfit, and you can choose the match, blend and clash the suggestions! Clever, eh?

Color Riche Glitterati collection

Now, the new collection for the A/W13-14 and party season: the polishes are just gorgeous. As the name Glitterati suggests, all four shades are glitter based. What I really like about them is that you can use all as a topcoat, as an accent for nail art or on their own. They all have the Color Riche fan brush too, which is great! I swatched on the wheel with 3 coats; as you can see, the polish is very saturated with glitter. Two coats will also give a very good coverage.

Loreal giitterati collection

Sequin Extravaganza, Scarlet TInsel, Bling Bling Bang and Black Diamond

Sequin Extravaganza is an explosion of glitter colours and shapes. Clear base with mainly silver glitter in various shapes and sizes, it also has a bit of gold, blue, pink and green. This makes this polish quite multi-dimensional, and although there are so many different sizes, shapes and colours, it all sits together so well it creates the illusion of one layer. Pretty.

Scarlet Tinsel is a sea of beautiful dark pink fine glitter. It sparkles a lot and on its owns gives the nail a uniform cover.

The jellish blue base with sapphire blue glitter Bling Bling Bang is far from shy. The glitter is also a combination of small and fine with bigger circles and It has a jewel-like finish and looks amazing on its own, but also lush on black and other colours, with a little bit of colour shifting. I think I’ve been Bling Bling Bang(ed) – I actually tweeted it to L’Oréal. I have no shame.

Finally, Black Diamond is a metallic black with fine silvery glitter. It is the more discreet from the collection and looks beautiful on and it looks like asphalt when on. Like it.

Nails à Porter

click on the image to enlarge

We also found out about a new product L’Oréal is launching: Nails à Porter, their answer to the express manicure. The new fake nails, hitting the shelves soon, are great. To start with, they are super flexible. They come in different designs, from the classic red and French manicure to bold gold and black. It has little stickers, a great selection of sized to match your natural nails and are said to last up to five days. I will be testing them soon and posting my finds! Exciting!

Masterclass

click on the image to enlarge

As we sat in our lovely manicure stations, nail expert Grace Humphries taught us how to create two nail designs: glitter tip and glitter half-moon and French tip, which I tried on the wheel too.

I ended up painting on hand (yes, one hand. Oh the shame to take to tube back with one untidy hand!) with Black Swan and a Sequin Extravaganza gradient from the cuticles. This combination is great!

At the end, there was a nail polish pick-and-mix, where we could take the shades we liked to enter their Nail Art challenge – to which I have promptly sent my design, using loads of the polishes I took home.

click on the image to enlarge

It was a lovely evening, packed with news and very informative. The people were lovely, the new polishes are amazing, the nails à porter are a very interesting product. Cannot wait to keep using the polishes!

Nails of the week: Spotty blue and yellow

blue and yellow spotty nails - somanylovelythings

It had been a while since I had a spotty manicure on. I’ve been meaning to do one for ages, and this week I finally got round to it!

I went for a pastel colours version: blue and yellow. This blue, Oxford from Nails Inc, has been a favourite for a very long time. The yellow came in the same set, and is called Wimbledon.

blue and yellow spotty nails - somanylovelythings

I used my one of my dotting tools to get the dots close to perfect (they never are!). Overall, a very easy mani to do, and very cute.

The polishes apply ok. As they are a bit on the old side, they stained a bit. I used two coats of the blue and three of the yellow.

blue and yellow spotty nails - somanylovelythings

Extra shine was given with the Seche Vite topcoat and durability is always fantastic with Nails Inc polishes!

Rating:

4_star