Nails of the week: nude and red

red and nude nails - somanylovelythings
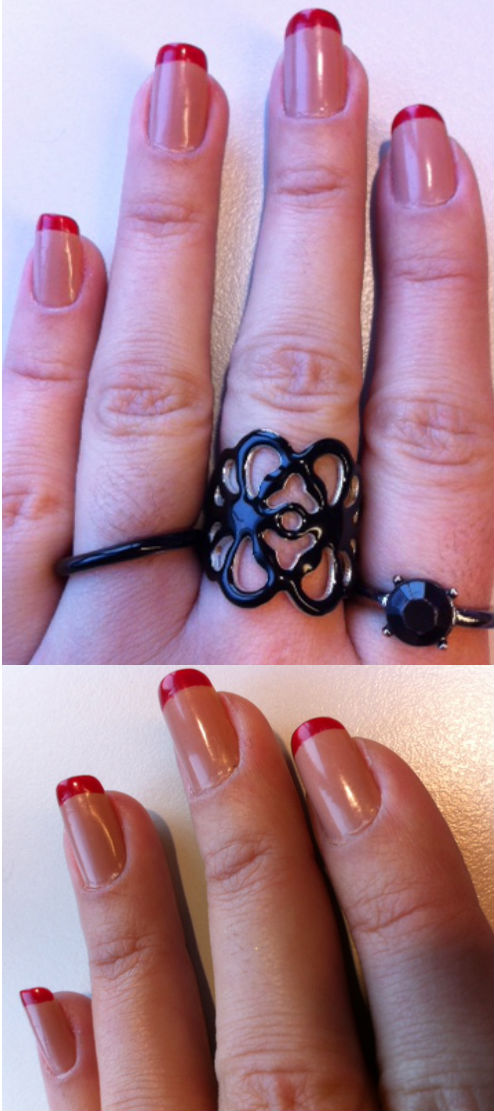
This week I went again with a combination I love: discreet nude and vibrant red.

Originally, I wanted to do a nude half moon manicure , with red on top, but that didn’t go that well for me; somehow the half moons were too big, looking more like full moons and I wasn’t happy with it. At all.

So I got my dotting tools out and added some red dots… it looked ok but still not great, so I added some nude dots in between and ended up with this kind of dripping mani. I didn’t like it a lot, but it grew on me; the fact it is impeccable after 8 days helped me like it more.

So I started painting the whole nail with the Nails Inc nude Basil street and the applied Colorama’s 40 Graus over it, leaving the (ginormous) moon. Using the dotting tool, I added red dots close to the half moon line and then added the nude ones, intercalated.

Had I thought I was going to end up with a dripping mani, I would’ve Kenmore precise – I just went adding dots randomly… It didn’t end up too well, but I don’t hate it!

Rating:

3_star

Nails of the week – pink gradient

pink gradient nails - somanylovelythingsOh, how I love a good gradient. Relatively simple to do (it just requires a bit of patience!), gradients deliver great “value for money”. It is pretty, different and can be done with the cheapest, plainer nail polishes around. Love it.

I am totally in love with this weeks mani – it is girly and sparkly, totally gorgeous (even if I say so myself!)

I used a light pink from Kiko, number 376 candy pink, and a dark pink from Revlon, sweet tart. As usual for my gradient, I painted all nails plain white (Natural Collection nail tip whitener) and sponged the pinks after it was dry.

To finish it off, I applied one coat of the super gorgeous electric lane from Nails Inc, which gave it sparkles and an extra dimension with its holographic goodness.

Application was a bit long. I did the white base, let it dry for most of the day and sponged in the afternoon on a Sunday, it took three rounds of sponging. All together, counting base coats and top coats, I have eight (yes, you read it right!) EIGHT coats of nail polish on! However, durability is ace: I’m on the 8th day, no chips! What annoyed me this time is that there was an awful lot of excess polish under my nails and that was a pain to remove… Having said that, it was well worth it!

pink gradient nails - somanylovelythings

You will certainly see more gradients coming soon… watch this space!

Rating:

5_star

Nails of the week: nude and red

nude and red nails somanylovelythingsYes, you read it right. I have nude on my nails at the moment. Yes, I also thought this day would never come… but I had a nail emergency: I came back from holidays, was going out the day after, had to be at work and had no time to sort out my nails. The previous mani was past its prime and I had to take it off… so came up with a quick fix: wear a base coat and do a red french manicure. But I loved it so much that I decided to do it properly, and they ended up being my new years’ eve manicure!

So I used Nails Inc Basil Street, a lovely nude that applies beautifully – no streaks and a solid coverage with two coats. Then I applied Colorama’s Tapete Vermelho on the tips to create the French manicure.

I am in love with this look – it is simple and so effortlessly elegant… a classic with a very little twist.

Durability has been great, seven full days – I did have a breakage, now both my thumbs are far from perfect (one is awful, hence being missed from the photos).

What do you think? I love French manis, really do… planning my next one already!

Rating:

5_star

Nails of the week: purple gradient

purple nail gradient
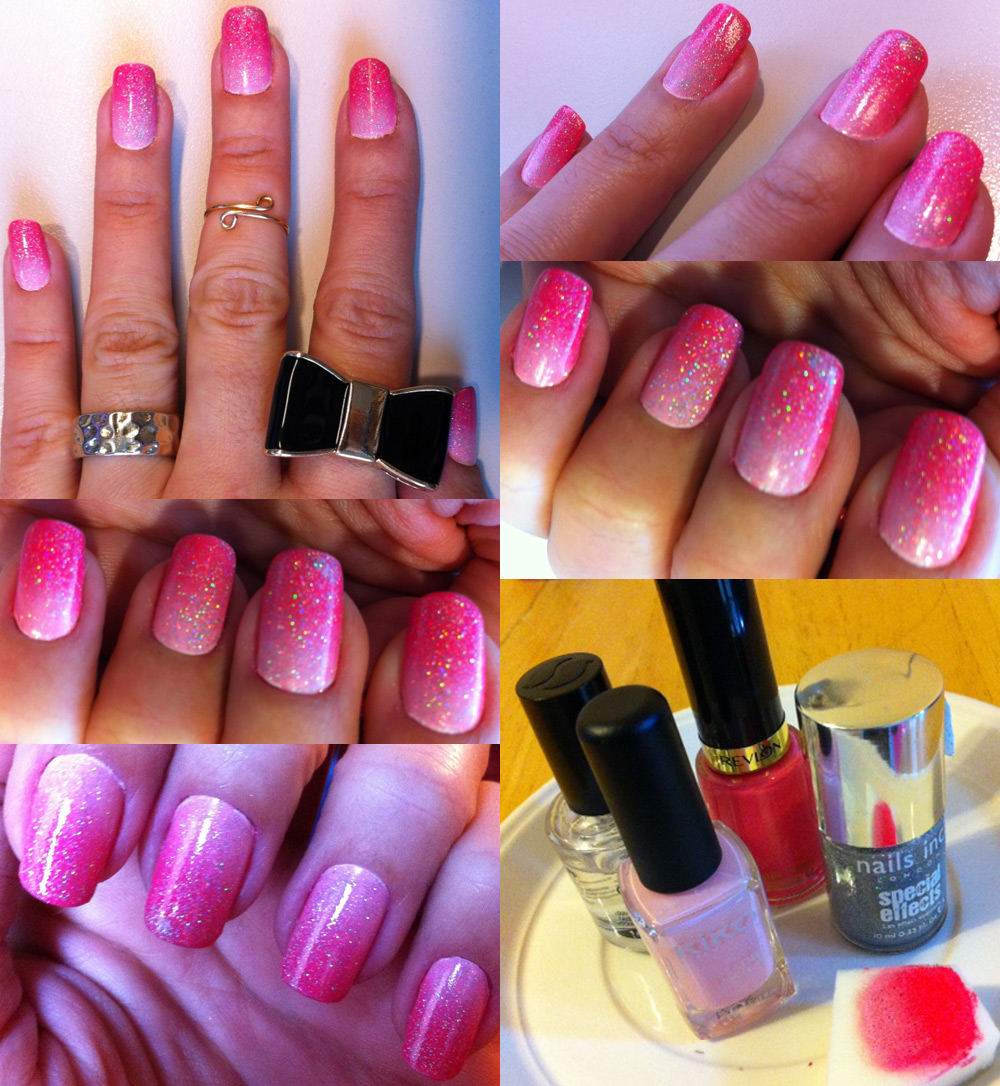
Since I tried my first gradient a few weeks back, I’ve been dying to try another one, but this time with three colours.

I picked purples. I love purple on my nails! I chose a lilac from Nails Inc, Cambridge, a light purple from H&M, Pale Violet and a dark purple, also from Nails Inc, Belgrave Place.

First I painted my nails white using Natural Collection’s nail tip whitener. I then got my sponge and painted three lines on it, from lighter to darker and stamped the nails. I described the technique in more details on my previous post on gradient.

This took four rounds of stamping, more than my first one, to look good! But I am very pleased with the results. Again, after applying the topcoat there was a bit of shrinking, so I can see a tiny bit of the white, that bothers me a little bit!!!

Overall, loving it – caught the eyes of lots of people, even on the train, where I then explained the technique! Nice!

Rating:

5_star

Nails of the week – glitter sprinkles

After re-doing my nails twice in a week, all I wanted was something to last seven days.

During one of my regular walks though House of Fraser in Oxford St (I work really close, and sometimes go home via the shop – it is almost therapeutic, but can be very dangerous) I walked past the Nails Inc. counter and fell in love with one of their polishes from the Sprinkles range.  They have four shades, and I bought Sweets Way, a pinkish white base with silver, pink and blue glitter.

Application was smooth. Two coats will give you good coverage, but I went for three. The texture is not too rough and durability was really good. There was a small amount of chipping (just glitter coming off) from day five,  but I blame that on myself, as I forgot to use a topcoat.

A really cute shade. Extremely delicate and seriously reminded me of sweets sprinkles!

Rating:

Nails of the week: blue and glitter

This week I was going to do a French and half moon manicure using two shades of blue but it didn’t turn out nice. At all. So I removed it all. Decided to stick to the blues but only in alternate colours, with a glitter topcoat – a recurring combo for this blog!

The light blue is no stranger to us; I wore Nails Inc. Oxford in several occasions, but never in more than one nail on each hand. The darker blue is Electric Blue 336 from Kiko; application was smooth, the colour is quit solid and it applies evenly.

I used two coats for both polishes. The topcoat is a pretty transparent base with some holographic coarse glitter and hexagons, that seemed to give the polish a “wet” look. The polish was easy to apply, it has a good amount of glitter in, but as I like a lot of glitter, I had to dip and stir the brush to make sure I picked up a good amount.

I liked the effect; it was very pretty in light, but with direct bright light, it looked a bit weird; it didn’t have colour and on the lighter shade of blue, it seemed something like yellow-ish glue residue (hence the out-of-focus pics, where you can actually see how it looks like). Durability was top; it was still looking great after seven days! But overall, for me, it just lacked oomph.

Rating:

Nails of the week – cold tones and silver glitter

A pretty pale mint green dress with silver sequins from Lipsy was my choice to attend a wedding, and I thought I would give myself a manicure to match.

I first thought of contrast, but then decided to go with several cold colours and a sprinkle of glitter to glam it up!

Most of the nail polishes I used are from Nails Inc;  the lilac (Cambridge), the blue (Oxford) and the lime (Wimbledon). The green is Anna Hickmann in Vibe and the pale mint green (which is a perfect match for my dress) is H&M in Pear  Ice cream.

Have to say that for being creamy colours, all of them were easy to apply and two coats were enough for the a solid finish. I had tried the blue and both greens before, and they didn’t disappoint. The lilac one bubbled a bit, that was annoying; but as it was in the corner of the nail, it didn’t bother me as much as it would normally.

The lime colour is stunning; I must wear it again soon,alone, need to come up with something interesting to use in more extensively!

Then I applied the glitter puff – I am in love with them! This time I used the silver again, but not on the tips but near the cuticles, as I used the gold a couple of weeks back. I am having to hold myself now to buy a bigger set from eBay, damn, they can glam up any manicure!

Rating:

Nails of the week – multicoloured French manicure

Well, I have spring on my mind so this week I decided to go all out. YES, all out.

Not only I painted one nail a different colour but I also added French manicure on them, in contrasting colours.

And you know what? I really like it. It is a bit different, it is a bit out there, and a bit brave. I wasn’t sure to start with, but they grew on me and managed to stay for a whole week.

To achieve the look, I painted each nail using a H&M nail polish kit; for a mere £2.99 you get four summer proof shades – bright pink, yellow, mint green and purple. As I have five fingers (!) I added a pastel blue, the gorgeous Nails Inc in Oxford Street.

I mentioned the Nails Inc one before, so if you want to know more about it, check here. I was very surprised with the H&M ones – quality was good and 2 coats gave a great coverage, even for the lighter shade, the mint green – I encountered bad quality creamy coloured polish that offers an awful coverage, full of streaks, so this was a very pleasant surprise.

I then waited two hours and applied French manicure stickers which I bought from eBay, but had never used before. I applied a contrasting colour in the same order a applied them on my nails – and voilá!

Durability was ok. French is not the most durable type of manicure, as the attention – and all the rubbing – is at the tip. However, it lasted well for five days. On the sixth day, I re-touched the tips… and it was actually passable, until my next manicure.

I am very pleased I took the plunge and ventured into something different!

Rating:

Nails of the week – blue + stamping

Well, it seems I am still a *little* bit obsessed with blue, and this week, I have painted my nails another shade of this lovely colour.

The blue I am wearing at the moment is electric, almost royal; it falls a shade or two shorter from it, and it is called Pop Fiction from Miss Sporty.

I am rather excited about my nails this week as I have tried a couple things I had never done before: an accent nail, which I painted with Nails Inc. in Oxford, a lovely pastel blue, and nail stamping.

I bought 16 Bundle Monster plates a while back, plus a Konad double ended stamp and scraper, and was looking forward to trying it. So, within this post, I will do a mini review of the plates. The patterns are ok, I mean, there are only about six plates I really like, but that didn’t bother me that much. A major disappointment was the fact some of the patterns are not deep enough, so when you scrape, no polish stays in, so there is nothing for the stamp to pick up. I tried several nail polishes and some of the patterns I really liked were, unfortunately, unusable.

As a first time experience, once I found a pattern I liked and that worked, from plate BM19, I think it was relatively ok. I had to remove the polish and re-do a couple times, and do the “paint plate-scrape-press stamp” act one too many times (and sometimes the pattern on the stamp wouldn’t be complete) but it looks cute and I am very happy with the result! I am not sure if I could actually cope with stamping every single nail…. I suppose practice would help!

The nail polishes application was very good; the Miss Sporty one has exceptional coverage; I used two coats, but with only one the colour was solid enough. The Nails Inc pastel blue was also very good, coverage was great, but two coats are a must. Durability is alright, there was one or two minor chips after five days, but I did put my nails through a bit!

Overall, a winner – the Miss Sporty blue for me is the star here; it is absolutely stunning and is quite similar to a blue Beyoncé was seen using a few weeks ago. I was very surprised I loved it this much, as there had been a very long time since I last wore a block, plain colour on my nails, as you know, I’ve really been into my effects nail varnish! I am very glad I did!

Rating:

Nails of the week: half-moon black and blue

Inspired by fashion week, I decided to try something different on my nails, so, for the first time I had half-moons on my talons. And I settled for matte pastel blue and black, after my gold and black attempt failed.

Tip number one: paint the half-moon colour one day and the top colour the other, to avoid disappointment.  Initially, I used Barry M foil effects in gold; it is a thick polish and even though it  seems to dry really quickly, after an hour, I applied the French manicure stickers to the bottom of my nails, painted the rest black and when I peeled them, the gold came off.

So I decided to change colours and used two coats of Nails Inc in Oxford, and the following evening, I used new stickers and applied two coats of Black Barry M over it.  Application was smooth, and the Nails Inc pastel wasn’t a pain to apply, as most creamy light shades; the second coat provided a good coverage, fit for a full 24-hour solo use! The Barry M was also good,  two coats for perfect, smooth and super shiny jet black.

Now, second tip: because I wasn’t sure I wanted matte effect, I waited a bit to apply the topcoat. The adhesive on the strips was very strong, so fluff from a hand towel kinda stuck to the remainder of glue on my half-moons and it was pretty hard to get rid of. I should’ve put the topcoat immediately after painting. You live, you learn!

For the very first time I also tried Gosh’s Matte effect topcoat.  It creates a great matte effect which I loved; the idea of turning any nail varnish into matte is indeed very appealing, but after a few days of wear and tear it started to look shiny again, so a re-touch is definitely recommended after three or four days to take it back to its matte glory.

I had to put four coats of nail polish plus one topcoat. Add to that a topcoat re-touch, and you have SIX layers altogether – way too much for my liking, looks like I am growing a nail on top of my nail! It lasted surprisingly well, I really though all the layers would compromise durability, but there isn’t a single chip in sight, after four days.

Overall,  I love the half-moons; the pastel blue+black combination is great. I know they are not perfect, but I am pleased as a first attempt. I will definitely venture on to other designs, have already some things in mind, so watch this space!

Have you tried it before? How did you find it?

Rating:

See all Nails of the week posts