It’s wedding season!

Calm down, I am not settling (down)! Now to the real reason behind the title…

If you are a bride, there are lots of big ticket items you will definitely have ticked off your list, but we know the devil is in the detail and one of the little touches that makes a big difference is giving your bridesmaids and wedding party a thoughtful gift. 

They supported you through the blissful, the stressful and even maybe the bridezilla and it’s lovely to say thank you for having them in your life. 

How, you ask? Pandora has a lovely bridesmaid collection, geared towards this type of gifting, but also options aplenty on the site, and with options for various budgets – be it to keep as a token of gratitude and friendship or to wear on the day. 

The collection is very stylish and carries very intricate and symbolic designs, ranging from classic to trendy, certain to meet all varied tastes and age groups.

The selection of their famous charms for the occasion is very cute, some carrying meaningful messages. You can build a bracelet for £129.

On top of that, a necklace is always a good choice, and Pandora’s selection is second to none – the one I was gifted, Shimmering Wish, costs £70 and it’s sterling silver with cubic zirconia in the shape of a wishbone.

It can be made into a set with earring and a lovely bangle with the same design.

Apart from being beautiful and well crafted, Pandora really helps take a tiny bit of stress from having to go to many places to gift your wedding party – to be honest, most of their jewellery is more than suitable for the occasion.

We were presented with the new collection at the Ivy Tower Bridge, over a fun night for food and drinks, where we had a calligraphy workshop  – which is also handy to get those gifts an extra special touch! 

I am pretty sure that thanking your bridesmaids with a Pandora gift would have them, unintentionally, thanking YOU for a thoughtful gift to be kept for a long time.

written by Dani

You know the drill, but I’ll say anyway: I was invited to see the collection and was gifted the necklace. This piece, however, is based on my honest opinion.

You, Rockstar

sleek-rockstars-collection-review-2
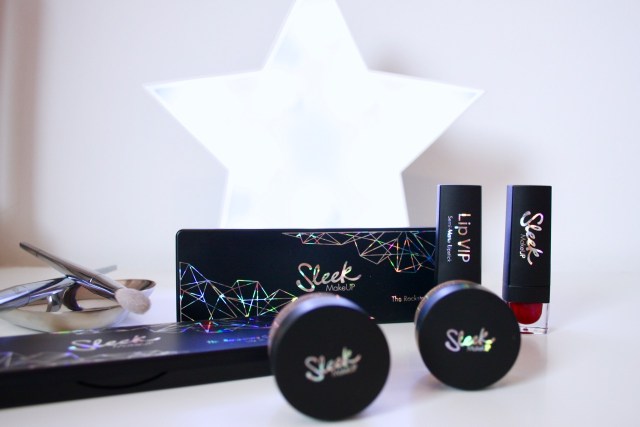
Sleek is bringing the sparkle back. And they don’t it by halves: living proof is their new Rockstars collection, just launched.sleek-rockstars-collection-review-14
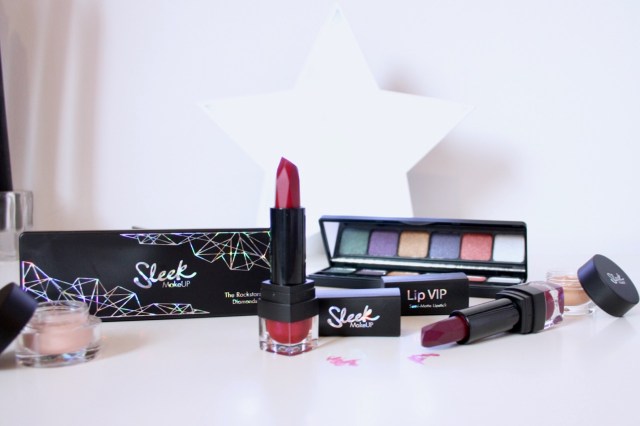
Perfect for Christmas and by that I mean all the parties soon to commence, the Rockstars collection has two sides.sleek-rockstars-collection-review-5
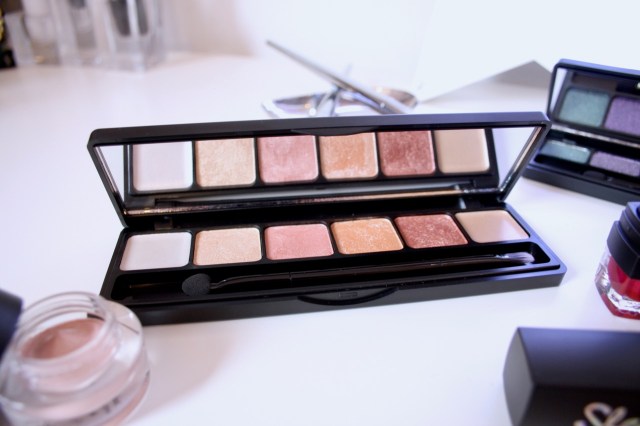
On the lighter side, Diamonds in the Rough with a lot of rose, golds, champagnes and peach in their eyeshadow palette, with two rich cream shades; the golden one makes the best highlighter!sleek-rockstars-collection-review-6All metallic and beautiful, including the gorgeous Scandalous lipstick, a metallic deep red and a highlighting soufflé in pretty shimmery peachy pink, called Pink Opal.

The darker side has jewel tones. Highly pigmented and glistening metallic, the appropriately named Hidden Gems palette has eyeshadows ranging from silver to royal purple.sleek-rockstars-collection-review-10The Superstar lipstick is a metallic shade of deep warm purple with iridescent particles, also present on Scandalous.sleek-rockstars-collection-review-7The highlighting soufflé here is Smoky Quartz, a gorgeous slightly glittery light gold, perfect for cheekbones but even better for finishing the eyes with an intense shimmer on top of colour.

sleek-rockstars-collection-review-13The bullet on the lipsticks deserves a chapter to itself: faceted, they have a sculpted shape, cut as the jewels they are.

Now the prices? You know Sleek has a fantastic value in all their collections and this is no different.

The Diamonds in the Rough and the Hidden Gems eyeshadow palettes cost £7.49 each, the Scandalous and Superstar Lip VIP lipsticks, £5.50 each and the Pink Opal and Smoking Quartz highlighting soufflés, £7 each.

You can get the whole Rockstars Collection at the Sleek website or at Superdrug.

signature1

You know the drill, but I’ll say anyway: this post contains PR samples. This review, however, is based on my experience with the product and reflects my honest opinion on them.


Emma-Kate Francis Calla Lily Pendant from JewelStreet

emma-kate francis calla lily necklace - somanylovelythingsI’m a huge fan of pearls; always been – when I was a little girl, I had the prettiest pearl earrings and ring.

Fast forward many years, they are still part of my wardrobe, and the latest addition, Emma-Kate Francis Calla Lily necklace, from JewelStreet, is definitely the star of the lot.

Continue reading

JORD Sidney wood watch

JORD Sidney wood watch

Confession: I hadn’t worn a watch in about 20 years. And JORD changed that completely when they sent me their beautiful Sidney wood watch.

Continue reading

Nails of the week – silver glitter, black and nail sticker

silver nails with black tips and nail tattoos

click to enlarge

I am in love with this week’s manicure! Glitter is one of my guilty pleasures – I love sparkly things, especially on my nails, even though it is a major pain to get it off.

This week, I am wearing Barry M in Silver multi-glitter, a fine, silver based glitter with lots of other colours – red, blue, pink, a bit of gold. Really really pretty. Actually, Barry M’s glitter polishes are really amazing, at a great value! This particular one is very saturated, two coats were enough to achieve a good coverage. I ended up using three, but could’ve done with only two.

With Barry M in plain black, a staple in my mani box, I created the diagonal tip, using  normal sticky tape.

To finish it off and give it that extra cuteness, I added a SkinArt UK’s bow nail tattoo on each of my ring finger nails to create an accent nail. The tattoos come in a pack of 60 individual stickers with varied designs – bows, stars, hearts, birds, crosses, anchors – all very pretty and you shall be seeing more of it very soon! I found application easy enough; it is quite delicate, as it is a small sticker, but I applied quickly without a problem, with the aid of tweezers. A good topcoat (I use Seche Vite) is a must after you apply the sticker, and also to smooth the diagonal french tip.

Durability was great, full week with no chips, sticker in place! But above all, how pretty is that?

Rating:

Nails of the week – silver holographic nail foils

To make up for the short life of my bead manicure, I had to choose another half-life, or occasion manicure: nail foils.

I love nail foils. They deliver an amazing effect. Truly stunning. But they do last three days. As a busy person, I think a good manicure is made to last at least seven days in a good state. On occasions, I do compromise this conviction for prettiness. Yes. Guilty as charged.

So, after I lost my beads, I decided to fill up the week with these amazing foils from Minx. They have the most amazing selection of designs. I bought I couple over Olympia Beauty a couple months ago.

They were quite easy to apply – just heat with hair dryer, peel and apply on nail, smoothing it, cutting the excess at top and filing to finish. They are extremely thin and sticky, a great sign. But if you make a mistake, like a crease, and have to peel it back to re-apply, you can see the texture of the foils changes, so ideally, do it once. I didn’t manage to do it in one go on all nails, so there were a couple imperfections, but nothing too blatant.

The effect was absolutely stunning. I mean, breath-taking. The rainbow colour shift this silver foil gives is something I never ever saw before.

And it lasted three days, bang on my expectations. So yes, would do again, it would be great it lasted as much people say they could (a week? hahahaha),  but truth is, after three days it looks a bit manky, with jagged edges…. a shame, but well worth it!

Rating:

Nails of the week – holographic black with silver French

Oh, the French manis… I cannot stay away from them for too long! I just find them so elegant – and quite simple to do!

Recently, I received a little haul I did in Brazil; I bought the polishes from Specialittá’s website and got them delivered to my friend’s mum home. My friend was about to come to London, so she kindly brought them to me!

I love this brand’s polishes; they apply well, have great colours and the durability is fantastic.

With this one, is no different – I am wearing a holo from their No Olimpo range, in Zeus which is a dark graphite/black. The colour is super pretty, the effect has great depth and it comes through under different lighting, which is more than I can say for others holos I wore in the past.

Most pictures were taken with flash, to show the best of its holo goodness… the one in the bottom left hand side corner was taken on natural light, so still a pretty good show there.

While one coat is quite sheer, two will do for great coverage, but I used three coats.  I them applied Barry M foil effects in Silver to create the French manicure.  I finished it off with Seche Vite top coat. The gloss finish is amazing; it looks sooooo shiny and perfect! And after 10 days it is still pretty much intact!

Very happy with this mani!!!

Rating:

Nails of the week- purple with multicoloured foil

Yes, I have been totally MIA. I have the best excuse for it though; I was on holidays!!! Yay! Well, not so much yay as I am back. Boyfriend and I spend 11 amazing days in the US – New York, Chicago, northern Michigan, plus a quick dash over the border to Canada, to Toronto and Niagara Falls.

So I had to wisely choose holiday nails, which would look pretty on my holiday snaps and to last me a week until I had to change it for the wedding I attended. I knew I was going to wear red for the nuptials, as I was wearing the prettiest yellow dress, so decided to go purple before that.

I bought an unbelievably bargainous ColorClub set from TKMaxx, I mean, £7.99 for six polishes and a topcoat. Amazing. I bought the Alter Ego”Keep it under cover” set, with lovely berry shades.

I recently discovered the foils sheets; so ordered five varieties from eBay, plus glue; and I had been looking forward to using it, as the effects I saw were very pretty!

My choice was the ColorClub Secret Agent as a base and after it dried I applied the glue with irregular strokes, let it dry until I couldn’t see it anymore and pressed the foil sheet rainbow Swirl, a pretty silver base with blue, green, pink, lilac and yellow swirls, on to the nail. The colour transfered nicely, and it was pretty easy to do; I applied a bit more glue where I thought there were gaps or I hadn’t applied enough first time around and repeated the process. I then applied a topcoat.

The result was fantastic. I was delighted with it. Pretty, very pretty and quite different.

20120827-143201.jpg

Now, the durability wasn’t the best. Whereas the polish was great, after a few days the foils started to rub off, especially on my index finger… bits of it were coming off, and even though it wasn’t a massive problem, as the base colour was still going strong, it lost a bit of its appeal.

Still, I am certainly going to do it again (actually, I have already, as I had a plain red manicure for the wedding, and removed it a couple days ago to replace with a new foil effect one!).

Rating:

for the prettiness

Eye make-up look challenge – black and silver

Haven’t posted an eye make-up look trial for quite sometime now; but I managed to get this one out and wanted to share how it went.

My aim was to create a dark silver smokey look, with black, as I had just bought a black silver-studded crop top! I wanted it to be dramatic so I added extra big lashes!

I started with the primer (e.l.f, not shown), and brushed the silver pigment all over the lid. I then lined my upper lash line with the gel liner, extending the flick at the end, and my lower water and lash lines with the eye kohl, also extending the flick parallel to the top one. Then, I generously applied the matte black eyeshadow and smoked it, with the pencil brush for definition, just in the corner and around the crease shape, blending just a little bit towards the centre.

I applied the supracolour cream on to the inner corner of the eye and between the upper and lower flicks, as well as to 2/3 of the way of the lower lash line. I brushed the sparkles all over the lid and the highlighter on the brow bone. Finally, I applied the lashes.

Happy with the look, definitely wearable on a night out! I would however, tone down the lashes, and wear a slightly smaller pair!

Products I used:

  • NYX loose pearl powder pigment in silver
  • H&M eyeshadow in Party Silver (sparkles)
  • MAC eyeshadow in Carbon (matte)
  • Bodyshop brilliance powder (highlighter)
  • Maybelline Eyestudio Lasting Drama gel liner in black
  • Kryolan Supracolour in silver
  • Maybelline Volum’ Express One by One mascara
  • MAC eye kohl in Smolder
  • Duo eyelash adhesive (clear)
  • Eyelashes from eBay (given to me by my dear friend Gisele)
  • MAC brushes 219, 239, 283, 209, Maybelline eyeliner brush and Elf brush (for the Supracolour)

Difficulty level:

Nails of the week – Pink and silver

Inspired by Chanel, I decided to use pastel pink ad silver on this weeks nails. However, I went against to trying to replicate their latest design using the colours, as it made my nails look very small…. hum….

Anyway, the combination is a winning one and I used Kiko Candy Pink and Barry M foil effects in silver.

I decided to do what a friend described as an “upside-down French”; with the strip following the cuticle line shape, a bit different from the half-moon.

Kiko’s nail polish was easy to apply (very even for being a light, creamy colour) and I used two coats. Barry M’s quality is exceptional, as I mentioned before; only one coat for the strip. Great coverage, lovely shiny silver.

Durability was top. Seriously, ten days now as I am going on holidays and waiting to do my manicure, so it will last longer when away.

I really like this one. Found it very feminine and delicate!

Rating: